Difference between revisions of "Philopod pitch variation"
m (categorised) |
(Added notes on using six shots) |
||
| Line 46: | Line 46: | ||
[[Image:Philopod-example-5.jpg]] | [[Image:Philopod-example-5.jpg]] | ||
| + | |||
| + | === Notes === | ||
| + | |||
| + | This technique isn't limited to four shots with an ''up, down, up, down'' sequence. Lenses | ||
| + | with a narrower [[Field of View|angle of view]] or difficult scenes might require six shots at 60 degree | ||
| + | rotation. | ||
| + | |||
| + | In this six shot case, the obvious sequence of ''up, down, up, down, up, down'' generates | ||
| + | complex seams that are difficult to disentangle, I get better results with an | ||
| + | ''up, down, down, up, down, down'' sequence instead. | ||
[[Category:Tutorial]][[Category:Tutorial:Specialised]] | [[Category:Tutorial]][[Category:Tutorial:Specialised]] | ||
Revision as of 12:58, 11 December 2006
A philopod is a simple and portable alternative to a panoramic head. This tutorial covers just one way of working with a philopod to capture a full spherical panorama.
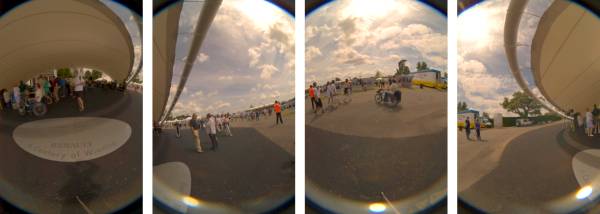
These pictures are taken with a full frame fisheye that has a 170 degree vertical angle of view when used in portrait orientation:
This means that it isn't possible to capture both the zenith and nadir with a single row of shots - This would require both a lens with an angle of view greater than 180 degrees and careful levelling of the camera.
However this isn't a problem if you manually tilt the camera up and down while capturing the sequence, something that is hard with a tripod, but easy with a handheld philopod. So the first and third shots are tilted down by 10 degrees or so, capturing the nadir, and the second and fourth shots are tilted up 10 degrees to capture the zenith:
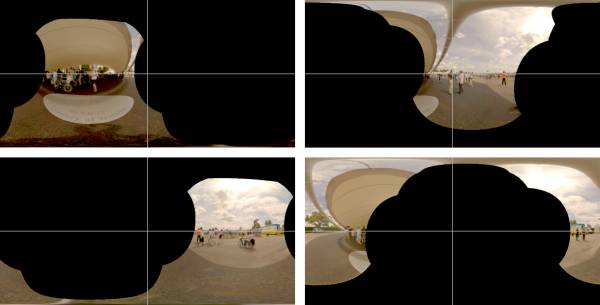
So when stitched together, there is a good amount of coverage of the entire scene:
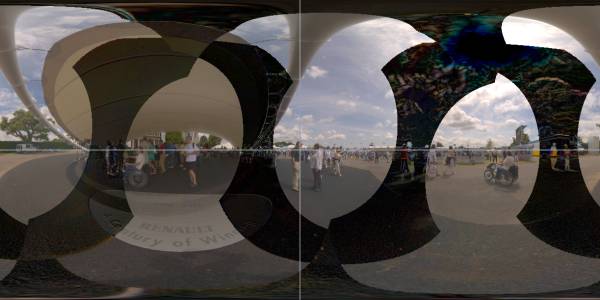
One problem with this system is that the stitching seams run directly through both the zenith and nadir. This causes problems for blending tools such as enblend, since they have no idea that this is an equirectangular image and get the seams wrong as a result. It is also difficult to hand retouch the poles for the same reasons.
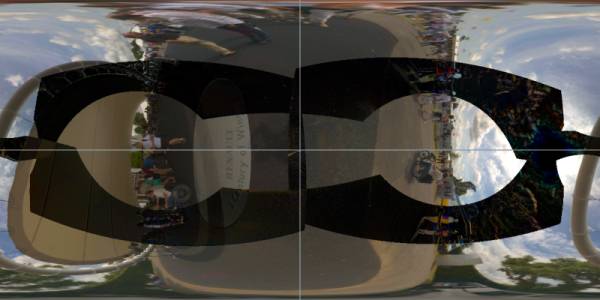
The solution is to stitch the panorama in different orientation with all the seams in the middle of the output where the equirectangular distortion is minimal:
This is very quick and easy to do, just adjust the anchor image so the weight at the end of the philopod is in the centre of the output. This has another useful advantage - The panorama is now completely self-levelling since the philopod forms a plum-line, so there is no need to set vertical control points to level the scene.
The final step is to flip the panorama back to a level orientation, just load it into one of the GUI front-ends as an equirectangular input image with a pitch of -90 degrees and stitch. Here is the result in Mercator Projection:
Notes
This technique isn't limited to four shots with an up, down, up, down sequence. Lenses with a narrower angle of view or difficult scenes might require six shots at 60 degree rotation.
In this six shot case, the obvious sequence of up, down, up, down, up, down generates complex seams that are difficult to disentangle, I get better results with an up, down, down, up, down, down sequence instead.
