Difference between revisions of "Noise reduction with enfuse"
m (Remove section about expert options) |
Erik Krause (talk | contribs) (categorized and wikified) |
||
| Line 1: | Line 1: | ||
| − | + | == Noise Reduction with Enfuse using image stacks. == | |
| − | It is a well known fact that digital cameras have increasing noise levels using high(er) ISO values in low light conditions. | + | It is a well known fact that digital cameras have increasing noise levels using high(er) ISO values in low light conditions. |
| − | For this example I just positioned the tripod, set my camera to "(high) speed burst" mode, pressed the release button for approx. 3 seconds and had 24 images: easy as that. (Never mind the composition, it's only an example) | + | Most modern cameras nowadays have builtin noise reduction systems to overcome this noise. These builtin systems mostly come in 2-3 steps ranging from light correction (leaving more noise, but preserving sharpness in the photo) to aggressive noise reduction (removing most of the noise at the cost of sharpness, thereby creating more blurred photos). |
| + | |||
| + | Noise is random. It is therefore also randomly distributed in your photo. Making image stacks and merging them into one image will reduce these random patterns. The better imaging software contain filters to allow you to merge image stacks by layering them and working with opacity (or other options). | ||
| + | |||
| + | Enfuse is much simpler. Just feed a stack of images into Enfuse and it will merge them fine, thereby removing the random pixels that give the noise in your images. | ||
| + | |||
| + | A method I often use, is by using the "(high) speed burst" mode on my camera. The "(high) speed burst" mode is normally meant for fast changing scenes, e.g. sports, to capture the right moment. It's also a great mode to swiftly capture a stack of images. | ||
| + | |||
| + | For this example I just positioned the tripod, set my camera to "(high) speed burst" mode, pressed the release button for approx. 3 seconds and had 24 images: easy as that. (Never mind the composition, it's only an example) | ||
| + | |||
| + | (Off course: In low light conditions your high speed burst mode might end up in a reduced speed burst mode due to longer shutter speeds. Still you can capture quite some images in short time). In the table below you will find the: single exposure, 6 merged exposures, 12 merged exposures and 24 merged exposures. | ||
<center> | <center> | ||
| Line 10: | Line 20: | ||
| Normal images | | Normal images | ||
| | | | ||
| − | [[Image:Enfnoisered-single-exp.jpg | 160 px | thumb]] | + | [[Image:Enfnoisered-single-exp.jpg | 160 px | thumb|Single Exposure]] |
| | | | ||
| − | [[Image:Enfnoisered-6exp-std.jpg | 160 px | thumb | + | [[Image:Enfnoisered-6exp-std.jpg | 160 px | thumb|6 merged exposures]] |
| | | | ||
| − | [[Image:Enfnoisered-12exp-std.jpg | 160 px | thumb | + | [[Image:Enfnoisered-12exp-std.jpg | 160 px | thumb|12 merged exposures]] |
| | | | ||
| − | [[Image:Enfnoisered-24exp-std.jpg | 160 px | thumb | + | [[Image:Enfnoisered-24exp-std.jpg | 160 px | thumb|24 merged exposures]] |
|- | |- | ||
| Cropped images | | Cropped images | ||
| | | | ||
| − | [[Image:Enfnoisered-single-exp-crop.jpg | 160 px | thumb | + | [[Image:Enfnoisered-single-exp-crop.jpg | 160 px | thumb|Single Exposure<]] |
| | | | ||
| − | [[Image:Enfnoisered-6exp-std-crop.jpg | 160 px | thumb | + | [[Image:Enfnoisered-6exp-std-crop.jpg | 160 px | thumb|6 merged exposures]] |
| | | | ||
| − | [[Image:Enfnoisered-12exp-std-crop.jpg | 160 px | thumb | + | [[Image:Enfnoisered-12exp-std-crop.jpg | 160 px | thumb|12 merged exposures]] |
| | | | ||
| − | [[Image:Enfnoisered-24exp-std-crop.jpg | 160 px | thumb | + | [[Image:Enfnoisered-24exp-std-crop.jpg | 160 px | thumb|24 merged exposures]] |
|- | |- | ||
| Cropped images 200% | | Cropped images 200% | ||
| | | | ||
| − | [[Image:Enfnoisered-single-exp-crop200.jpg | 160 px | thumb]] | + | [[Image:Enfnoisered-single-exp-crop200.jpg | 160 px | thumb|Single Exposure]] |
| | | | ||
| − | [[Image:Enfnoisered-6exp-std-crop200.jpg | 160 px | thumb | + | [[Image:Enfnoisered-6exp-std-crop200.jpg | 160 px | thumb|6 merged exposures]] |
| | | | ||
| − | [[Image:Enfnoisered-12exp-std-crop200.jpg | 160 px | thumb | + | [[Image:Enfnoisered-12exp-std-crop200.jpg | 160 px | thumb|12 merged exposures]] |
| | | | ||
| − | [[Image:Enfnoisered-24exp-std-crop200.jpg | 160 px | thumb | + | [[Image:Enfnoisered-24exp-std-crop200.jpg | 160 px | thumb|24 merged exposures]] |
|} | |} | ||
</center> | </center> | ||
| − | If you examine the "single exposure" image you will see severe noise in the whitish wall, the green vases, the cardboard box and in the beech wood dresser. From the above examples you can see the noise is strongly reduced in the "6 merged exposures" and almost no longer existent in the "12 merged exposure" version. The "24 merged exposure" is even better.<br /> Quality is always relative. Decide for yourself how far you want to go. | + | If you examine the "single exposure" image you will see severe noise in the whitish wall, the green vases, the cardboard box and in the beech wood dresser. From the above examples you can see the noise is strongly reduced in the "6 merged exposures" and almost no longer existent in the "12 merged exposure" version. The "24 merged exposure" is even better.<br /> Quality is always relative. Decide for yourself how far you want to go. |
| + | |||
| + | == Exposure fusion and noise reduction. == | ||
| + | The exposure fusion and noise reduction can be combined if necessary. Say you want to photograph a city skyline at night, or a nice building at night enlightened with spotlights. This is a perfect situation for enfuse. You take for example images at -3, -1.5, 0, 1.5 and 3 EV and get a nicely fused image. It might still contain quite some noise. Shoot e.g. 4+ (the more, the better) images at -3, at -1.5, at 0, at 1.5 and at 3 EV and feed this 20+ images into Enfuse. The result will be a nicely fused image with hardly any noise. | ||
| − | + | == Some last notes and remarks. == | |
| − | + | * "Does this work if I copy an image 12 times (or so) and use the above mentioned technique?" ==NO==, it does not. Remember that noise is a random pattern. If you copy the same image a number of times, the noise will always be in the same pixels, so it no longer is a random pattern. | |
| + | * Switch off your camera's noise reduction system or set it to a low setting. When using image stacks you want your input images as sharp as possible. | ||
| + | * Use a tripod and if possible a remote shutter controller. Align your images with align_image_stack before enfusing them. Your images will improve, especially in sharpness. | ||
| + | * You might also want to take a look at the [[Image Stacking]] article. Enfuse is also an excellent tool for that purpose. | ||
| − | + | == Other Links. == | |
| − | * | + | * [[Noise Removal]] |
| − | * | + | * [[NoiseRemove]] a helper program |
| − | * | + | * [[Enfuse#GUIs|Enfuse GUIs]] |
| − | * | + | * [[Enfuse reference manual]] |
| − | + | [[Category:Tutorial:Nice to know]] | |
| − | [ | ||
| − | [ | ||
| − | |||
| − | |||
Revision as of 17:34, 14 July 2009
Noise Reduction with Enfuse using image stacks.
It is a well known fact that digital cameras have increasing noise levels using high(er) ISO values in low light conditions.
Most modern cameras nowadays have builtin noise reduction systems to overcome this noise. These builtin systems mostly come in 2-3 steps ranging from light correction (leaving more noise, but preserving sharpness in the photo) to aggressive noise reduction (removing most of the noise at the cost of sharpness, thereby creating more blurred photos).
Noise is random. It is therefore also randomly distributed in your photo. Making image stacks and merging them into one image will reduce these random patterns. The better imaging software contain filters to allow you to merge image stacks by layering them and working with opacity (or other options).
Enfuse is much simpler. Just feed a stack of images into Enfuse and it will merge them fine, thereby removing the random pixels that give the noise in your images.
A method I often use, is by using the "(high) speed burst" mode on my camera. The "(high) speed burst" mode is normally meant for fast changing scenes, e.g. sports, to capture the right moment. It's also a great mode to swiftly capture a stack of images.
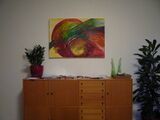
For this example I just positioned the tripod, set my camera to "(high) speed burst" mode, pressed the release button for approx. 3 seconds and had 24 images: easy as that. (Never mind the composition, it's only an example)
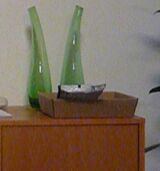
(Off course: In low light conditions your high speed burst mode might end up in a reduced speed burst mode due to longer shutter speeds. Still you can capture quite some images in short time). In the table below you will find the: single exposure, 6 merged exposures, 12 merged exposures and 24 merged exposures.
| Normal images | ||||
| Cropped images | ||||
| Cropped images 200% |
If you examine the "single exposure" image you will see severe noise in the whitish wall, the green vases, the cardboard box and in the beech wood dresser. From the above examples you can see the noise is strongly reduced in the "6 merged exposures" and almost no longer existent in the "12 merged exposure" version. The "24 merged exposure" is even better.
Quality is always relative. Decide for yourself how far you want to go.
Exposure fusion and noise reduction.
The exposure fusion and noise reduction can be combined if necessary. Say you want to photograph a city skyline at night, or a nice building at night enlightened with spotlights. This is a perfect situation for enfuse. You take for example images at -3, -1.5, 0, 1.5 and 3 EV and get a nicely fused image. It might still contain quite some noise. Shoot e.g. 4+ (the more, the better) images at -3, at -1.5, at 0, at 1.5 and at 3 EV and feed this 20+ images into Enfuse. The result will be a nicely fused image with hardly any noise.
Some last notes and remarks.
- "Does this work if I copy an image 12 times (or so) and use the above mentioned technique?" ==NO==, it does not. Remember that noise is a random pattern. If you copy the same image a number of times, the noise will always be in the same pixels, so it no longer is a random pattern.
- Switch off your camera's noise reduction system or set it to a low setting. When using image stacks you want your input images as sharp as possible.
- Use a tripod and if possible a remote shutter controller. Align your images with align_image_stack before enfusing them. Your images will improve, especially in sharpness.
- You might also want to take a look at the Image Stacking article. Enfuse is also an excellent tool for that purpose.
Other Links.
- Noise Removal
- NoiseRemove a helper program
- Enfuse GUIs
- Enfuse reference manual
