Difference between revisions of "Hugin Main window"
m (→Layout) |
m (→Tabs) |
||
| Line 21: | Line 21: | ||
you can find these on the [http://hugin.sourceforge.net/tutorials/ hugin website]. | you can find these on the [http://hugin.sourceforge.net/tutorials/ hugin website]. | ||
| − | For this same overview regarding the old gui you can start with [[Hugin Main window old gui]] | + | For this same overview regarding the old gui you can start with [[Hugin Main window old gui]]. |
== Assistant == | == Assistant == | ||
| Line 64: | Line 64: | ||
The [[hugin Crop tab]] allows you to apply simple masks to ignore these | The [[hugin Crop tab]] allows you to apply simple masks to ignore these | ||
areas from your photos. | areas from your photos. | ||
| − | |||
= Menus = | = Menus = | ||
Revision as of 23:31, 23 January 2013
| 2013-01-23: | Currently these pages are completely rewritten to reflect the state of the new designed GUI which will be released in 2013 |
|---|
Tabs
Although there are many other uses, hugin is primarily a tool for assembling multiple photos and creating a 'seamless' panorama.
Hugin is a program that is 'tab' based. Below you see an partial example screen of Hugin showing the tabs.

This process of assembling multiple photos and creating a 'seamless' panorama is completely automatic if you use the hugin Assistant tab, which is the default tab, but hugin also allows full manual control of every stage. For this hugin provides three user interface options: Simple, Advanced and Expert. The hugin simple mode consists of the hugin Assistant tab and a few other tabs that give you simple control on what you are doing.
This is a quick overview of this tab system for the Simple interface, it isn't a step by step tutorial, you can find these on the hugin website.
For this same overview regarding the old gui you can start with Hugin Main window old gui.
Assistant
The hugin Assistant tab is the fully automatic part of hugin, here you can load images, align them and stitch them into a panorama without having to use any of the other tabs.
Alternatively, you can use this Assistant as the first step in creating a project that will involve the use some or all of the other tabs. You can also switch to one of the other user interface modes Advanced and Expert if you want or need to.
Preview
In the hugin Preview tab you have some options to modify the preview as displayed in the Hugin Assistant tab like selectively displaying/hiding images and modify some view options.
Layout
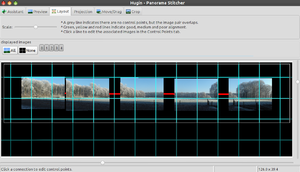
The Layout tab shows the entire project as a diagram with colour-coded lines connecting each of the photographs.
Green lines connecting images show the control points have a small error, red lines show a large error. Grey lines show no control points connecting the images.
You can see where the project is OK and where there are problems if it isn't quite right. Just click on any connection and Hugin jumps to the Control Points tab to edit that pair of photos.
Use the Scale slider to change the size of the photo thumbnails, this only effects the Layout display and won't change the final panorama.
Projection
Move/Drag
Crop
Often photos contain parts that you don't want to be used. Typically fisheye Projection images have a circular area in the middle with a useless black area outside. Scanned images have edges that need to be cropped away.
The hugin Crop tab allows you to apply simple masks to ignore these areas from your photos.
Menus
File
- New, discard the current project and start a new empty project.
- Open an existing hugin, PTGUI, PTAssembler, autopano or autopano-sift project file.
- Save the current project as a hugin pto file.
- Save as a pto file with a different name.
- Most recently used projects, shows a list of recent Hugin projects.
- Run Batch Processor, launches the Hugin Batch Processor GUI queue manager, note that the queue won't be processed unless this queue manager is running.
- Preferences opens the hugin Preferences window.
- Quit hugin.
Edit
- Undo, undoes the most recent change to the current project.
- Redo, redoes an undo.
View
- Panorama Editor opens the Editor window where you have control over the various states a workflow is going through from a set of source images to the panorama.
- Full Screen shows this Hugin Main window using as much screen space as possible without any window decorations. Note that the Hugin Fast Preview window can also be set as full screen.
- Overview shows the Hugin Control Points table.
- Grid shows the Hugin Preview window.
Interface
- Simple, This is the user interface this introduction is written for. It consists of all basic functionality to create a program and will suffice in 90% of all cases.
- Advanced, this user interface that starts hugin in the Panorama Editor screen. The simple interface is available in the background.
- Expert, this user interface also start hugin in the Panorama Editor screen and unleashes all the power and options of hugin.
Help
- Help opens the hugin manual.
- Tip of the day
- Keyboard Shortcuts
- FAQ, hugin Frequently asked questions.
- About shows the Hugin About window.
- Donate opens the Hugin donation page, there is no obligation to donate. Any donations are used for travel and promotion costs related to Hugin development.
