Historical:Using Autopano-SIFT With PTGui
Purpose and Background
Here is a procedure for using autopano-sift with PTGui, by text editing of the .pts and .pto files.
To automatically define control points, PTGui provides plug-in support for Alexandre Jenny's Autopano
In some cases, however, better control points may be found by Sebastian Nowozin's Autopano-SIFT. PTGui does not provide plug-in support for autopano-sift. So, you must use a procedure like described here.
Outline
The general procedure is simple:
1. Create a uniform gray dummy image.
2. Launch Autopano-SIFT and load the dummy image and all desired real images into it.
3. Have Autopano-SIFT find control points and write a .pto output file.
4. Create a PTGui .pts project file containing the real images in the same order as Autopano-SIFT.
5. Using a text editor, merge the Autopano-SIFT control points from the .pto file, into the PTGui .pts file.
6. Load the new .pts file into PTGui.
All done!
Example
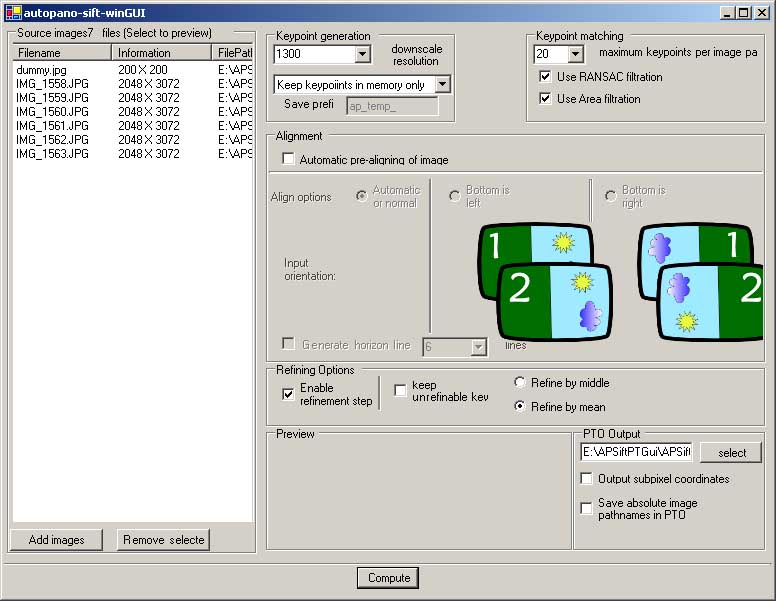
Autopano-SIFT screen showing images and options.
Note that the dummy file needs to have a filename that is alphabetical before your other image files, otherwise the dummy file will be after your image files.
Resulting .pto file:
# Hugin project file
# automatically generated by autopano-sift, available at
# http://cs.tu-berlin.de/~nowozin/autopano-sift/

p f2 w3000 h1500 v360  n"JPEG q90"
m g1 i0

i w200 h200 f0 a0 b-0.01 c0 d0 e0 p0 r0 v180 y0  u10 n"E:\APSiftPTGui\dummy.jpg"
i w2048 h3072 f0 a0 b-0.01 c0 d0 e0 p0 r0 v180 y0  u10 n"E:\APSiftPTGui\IMG_1558.JPG"
i w2048 h3072 f0 a=1 b=1 c=1 d0 e0 p0 r0 v=1 y0  u10 n"E:\APSiftPTGui\IMG_1559.JPG"
i w2048 h3072 f0 a=1 b=1 c=1 d0 e0 p0 r0 v=1 y0  u10 n"E:\APSiftPTGui\IMG_1560.JPG"
i w2048 h3072 f0 a=1 b=1 c=1 d0 e0 p0 r0 v=1 y0  u10 n"E:\APSiftPTGui\IMG_1561.JPG"
i w2048 h3072 f0 a=1 b=1 c=1 d0 e0 p0 r0 v=1 y0  u10 n"E:\APSiftPTGui\IMG_1562.JPG"
i w2048 h3072 f0 a=1 b=1 c=1 d0 e0 p0 r0 v=1 y0  u10 n"E:\APSiftPTGui\IMG_1563.JPG"

v p1 r1 y1

# match list automatically generated
c n1 N2 x174.513458 y810.332017 X1553.193699 Y1045.629094 t0
c n1 N2 x483.523575 y701.519402 X1859.457450 Y933.601250 t0
c n1 N2 x499.394895 y701.872004 X1875.586670 Y933.439960 t0
...many more control points not shown here...
c n5 N6 x477.779291 y2808.093329 X1761.086190 Y2894.792441 t0
c n5 N6 x479.476119 y2780.860167 X1764.997492 Y2866.882044 t0
c n5 N6 x581.980939 y1271.543946 X1961.858230 Y1321.353301 t0

# :-)
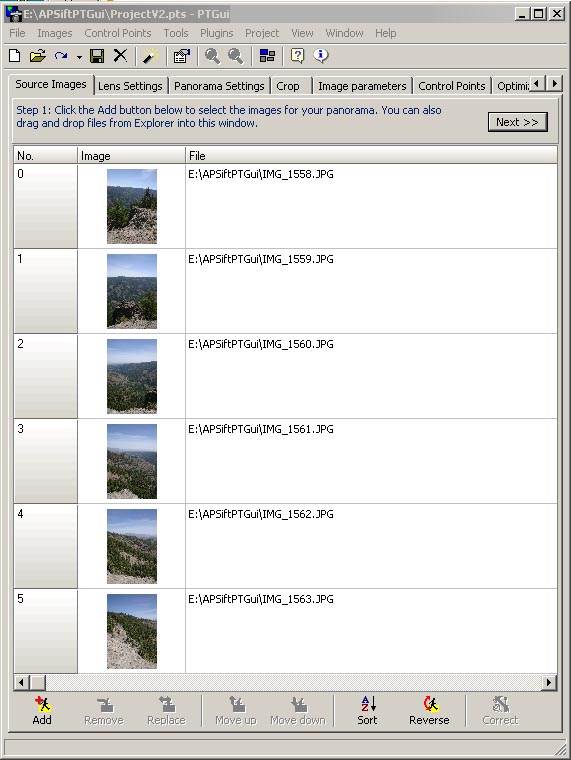
The PTGui screen:
The PTGui project file before control points added:
# ptGui project file

#-fileversion 8
#-jpegquality 90
#-previewwidth 250
#-previewheight 250
#-vfov 100
#-fixaspect 1
#-outputfile
#-ccdcrop 1.6
#-hasbeenoptimized 0
#-morphmode 2
#-simpleoptimizer
#-imgrotate000000
# Panorama settings:
p w1000 h1000 f0 v100 u20 n"JPEG g0 q90"
m g1 i0 f0

# input images:
#-dummyimage
# The following line contains a 'dummy image' containing some global parameters for the project
o w1 h1 y0 r0 p0 v45.2397298960809 a0.001 b0.001 c0.001 f0 d0 e0 g0 t0
#-imgfile 2048 3072 "E:\APSiftPTGui\IMG_1558.JPG"
o f0 y0 r0 p0 v=0 a=0 b=0 c=0 d=0 e=0 g=0 t=0
#-imgfile 2048 3072 "E:\APSiftPTGui\IMG_1559.JPG"
o f0 y0 r0 p0 v=0 a=0 b=0 c=0 d=0 e=0 g=0 t=0
#-imgfile 2048 3072 "E:\APSiftPTGui\IMG_1560.JPG"
o f0 y0 r0 p0 v=0 a=0 b=0 c=0 d=0 e=0 g=0 t=0
#-imgfile 2048 3072 "E:\APSiftPTGui\IMG_1561.JPG"
o f0 y0 r0 p0 v=0 a=0 b=0 c=0 d=0 e=0 g=0 t=0
#-imgfile 2048 3072 "E:\APSiftPTGui\IMG_1562.JPG"
o f0 y0 r0 p0 v=0 a=0 b=0 c=0 d=0 e=0 g=0 t=0
#-imgfile 2048 3072 "E:\APSiftPTGui\IMG_1563.JPG"
o f0 y0 r0 p0 v=0 a=0 b=0 c=0 d=0 e=0 g=0 t=0

# Control points:
#-cpinactive
#-imginactive
#-previewinactive
#-morphcp
#-nooptcp

# optimizer:
v v b y2 r2 p2 y3 r3 p3 y4 r4 p4 y5 r5 p5 y6 r6 p6
The edited PTGui project file, after merging control points from Autopano-SIFT:
# ptGui project file

#-fileversion 8
#-jpegquality 90
#-previewwidth 250
#-previewheight 250
#-vfov 100
#-fixaspect 1
#-outputfile
#-ccdcrop 1.6
#-hasbeenoptimized 0
#-morphmode 2
#-simpleoptimizer
#-imgrotate000000
# Panorama settings:
p w1000 h1000 f0 v100 u20 n"JPEG g0 q90"
m g1 i0 f0

# input images:
#-dummyimage
# The following line contains a 'dummy image' containing some global parameters for the project
o w1 h1 y0 r0 p0 v45.2397298960809 a0.001 b0.001 c0.001 f0 d0 e0 g0 t0
#-imgfile 2048 3072 "E:\APSiftPTGui\IMG_1558.JPG"
o f0 y0 r0 p0 v=0 a=0 b=0 c=0 d=0 e=0 g=0 t=0
#-imgfile 2048 3072 "E:\APSiftPTGui\IMG_1559.JPG"
o f0 y0 r0 p0 v=0 a=0 b=0 c=0 d=0 e=0 g=0 t=0
#-imgfile 2048 3072 "E:\APSiftPTGui\IMG_1560.JPG"
o f0 y0 r0 p0 v=0 a=0 b=0 c=0 d=0 e=0 g=0 t=0
#-imgfile 2048 3072 "E:\APSiftPTGui\IMG_1561.JPG"
o f0 y0 r0 p0 v=0 a=0 b=0 c=0 d=0 e=0 g=0 t=0
#-imgfile 2048 3072 "E:\APSiftPTGui\IMG_1562.JPG"
o f0 y0 r0 p0 v=0 a=0 b=0 c=0 d=0 e=0 g=0 t=0
#-imgfile 2048 3072 "E:\APSiftPTGui\IMG_1563.JPG"
o f0 y0 r0 p0 v=0 a=0 b=0 c=0 d=0 e=0 g=0 t=0

# Control points:
c n1 N2 x174.513458 y810.332017 X1553.193699 Y1045.629094 t0
c n1 N2 x483.523575 y701.519402 X1859.457450 Y933.601250 t0
c n1 N2 x499.394895 y701.872004 X1875.586670 Y933.439960 t0
...many more control points not shown here...
c n5 N6 x477.779291 y2808.093329 X1761.086190 Y2894.792441 t0
c n5 N6 x479.476119 y2780.860167 X1764.997492 Y2866.882044 t0
c n5 N6 x581.980939 y1271.543946 X1961.858230 Y1321.353301 t0
#-cpinactive
#-imginactive
#-previewinactive
#-morphcp
#-nooptcp

# optimizer:
v v b y2 r2 p2 y3 r3 p3 y4 r4 p4 y5 r5 p5 y6 r6 p6
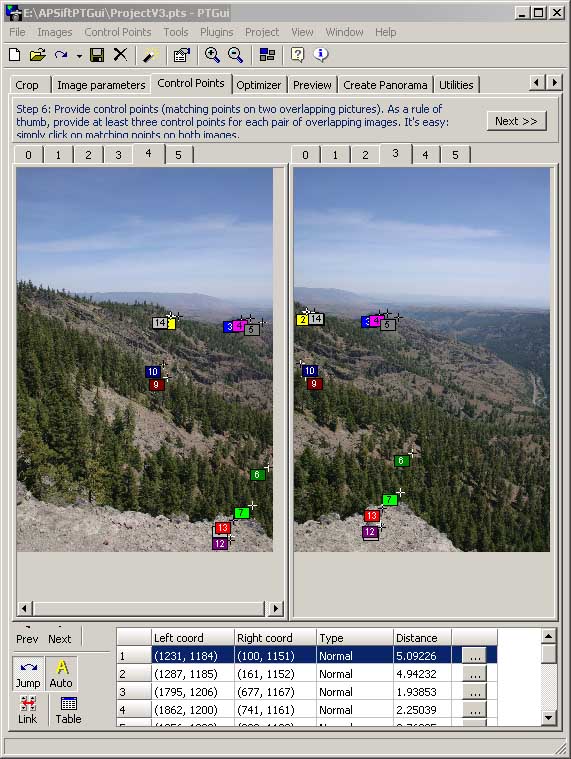
PTGui then shows control points like this:
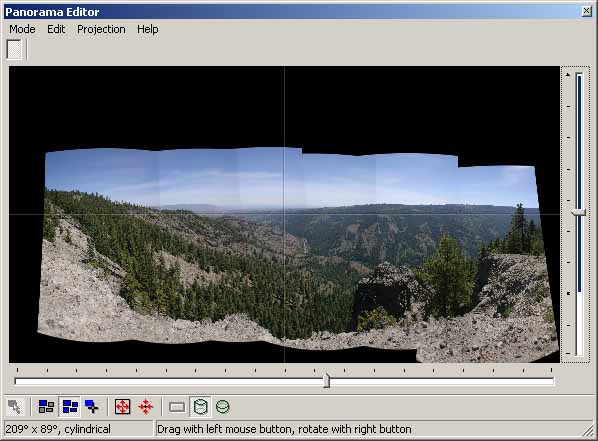
Optimize, adjust pano fov, center, and level the horizon to get this panorama:
The final PTGui project file looks like this. The optimizer has computed control point errors and interspersed them with the control point definitions. The control point coordinates have been converted to integers by PTGui.
# ptGui project file

#-fileversion 8
#-jpegquality 90
#-previewwidth 341
#-previewheight 184
#-vfov 89
#-fixaspect 1
#-outputfile
#-ccdcrop 1.6
#-hasbeenoptimized 1
#-morphmode 2
#-imgrotate000000
# Panorama settings:
p w9023 h4862 f1 v209 u20 n"JPEG g0 q90"
m g1 i0 f0

# input images:
#-dummyimage
# The following line contains a 'dummy image' containing some global parameters for the project
o w1 h1 y0 r0 p0 v44.9777 a0.001 b-0.010922 c0.001 f0 d0 e0 g0 t0
#-imgfile 2048 3072 "E:\APSiftPTGui\IMG_1558.JPG"
o f0 y75.6273 r-2.47403 p-14.1391 v=0 a=0 b=0 c=0 d=0 e=0 g=0 t=0
#-imgfile 2048 3072 "E:\APSiftPTGui\IMG_1559.JPG"
o f0 y45.0133 r-0.642895 p-9.85206 v=0 a=0 b=0 c=0 d=0 e=0 g=0 t=0
#-imgfile 2048 3072 "E:\APSiftPTGui\IMG_1560.JPG"
o f0 y12.9165 r1.01822 p-9.98844 v=0 a=0 b=0 c=0 d=0 e=0 g=0 t=0
#-imgfile 2048 3072 "E:\APSiftPTGui\IMG_1561.JPG"
o f0 y-13.0355 r-3.16182 p-8.09519 v=0 a=0 b=0 c=0 d=0 e=0 g=0 t=0
#-imgfile 2048 3072 "E:\APSiftPTGui\IMG_1562.JPG"
o f0 y-38.0791 r-2.58898 p-8.51665 v=0 a=0 b=0 c=0 d=0 e=0 g=0 t=0
#-imgfile 2048 3072 "E:\APSiftPTGui\IMG_1563.JPG"
o f0 y-69.0947 r-0.619798 p-8.26177 v=0 a=0 b=0 c=0 d=0 e=0 g=0 t=0

# Control points:
c n1 N2 x175 y810 X1553 Y1046 t0
# Control Point No 0: 1.62083
c n1 N2 x484 y702 X1859 Y934 t0
# Control Point No 1: 3.91225
c n1 N2 x499 y702 X1876 Y933 t0
# Control Point No 2: 2.81099
...many more control points not shown here...
c n5 N6 x478 y2808 X1761 Y2895 t0
# Control Point No 67: 1.54454
c n5 N6 x479 y2781 X1765 Y2867 t0
# Control Point No 68: 1.07268
c n5 N6 x582 y1272 X1962 Y1321 t0
# Control Point No 69: 3.5892
#-cpinactive
#-imginactive
#-previewinactive
#-morphcp
#-nooptcp

# optimizer:
v v b y1 r1 p1 y2 r2 p2 y3 r3 p3 y5 r5 p5 y6 r6 p6


