Difference between revisions of "Edit zenith and nadir in one go with PTGui"
m (→Remapping back to nermal view: Typo) |
m (fixed some typo's) |
||
| Line 12: | Line 12: | ||
== Workflow == | == Workflow == | ||
| − | === Remap to zenith and | + | === Remap to zenith and nadir view === |
<br> | <br> | ||
<br> | <br> | ||
| Line 21: | Line 21: | ||
<br> | <br> | ||
<br> | <br> | ||
| − | + | On the '''''Lens Setting''''' tab add the yellow highlighted values:<br> | |
<br> | <br> | ||
[[Image:PTGUIret_002.jpg]]<br> | [[Image:PTGUIret_002.jpg]]<br> | ||
| Line 27: | Line 27: | ||
<br> | <br> | ||
<br> | <br> | ||
| − | + | On the '''''Panorama Settings''''' tab add the yellow highlighted values:<br> | |
<br> | <br> | ||
[[Image:PTGUIret_003.jpg]]<br> | [[Image:PTGUIret_003.jpg]]<br> | ||
| Line 33: | Line 33: | ||
<br> | <br> | ||
<br> | <br> | ||
| − | + | On the '''''Image parameters''''' tab add the yellow highlighted values and you can immediately see the remapping of the image:<br> | |
<br> | <br> | ||
[[Image:PTGUIret_004.jpg]]<br> | [[Image:PTGUIret_004.jpg]]<br> | ||
| Line 40: | Line 40: | ||
<br> | <br> | ||
Enable '''''Lock aspect ratio''''', press '''''Set optimum size''''' button and compare the values with the original size of the panorama.<br> | Enable '''''Lock aspect ratio''''', press '''''Set optimum size''''' button and compare the values with the original size of the panorama.<br> | ||
| − | Choose as output file format '''''TIFF (.tif)''''' for fewer quality loss. Press '''''Create Panorama!''''' to start remapping process:<br> | + | Choose as output file format '''''TIFF (.tif)''''' for fewer quality loss. Press '''''Create Panorama!''''' to start the remapping process:<br> |
<br> | <br> | ||
[[Image:PTGUIret_005.jpg]]<br> | [[Image:PTGUIret_005.jpg]]<br> | ||
| Line 46: | Line 46: | ||
<br> | <br> | ||
<br> | <br> | ||
| − | You don't have to add | + | You don't have to add control points and optimize in this case, so press '''''OK'''''.<br> |
<br> | <br> | ||
[[Image:PTGUIret_006.jpg]]<br> | [[Image:PTGUIret_006.jpg]]<br> | ||
| Line 52: | Line 52: | ||
<br> | <br> | ||
<br> | <br> | ||
| − | Now you can see the | + | Now you can see the familiar progress bar of Panotools:<br> |
<br> | <br> | ||
[[Image:PTGUIret_007.jpg]]<br> | [[Image:PTGUIret_007.jpg]]<br> | ||
| Line 61: | Line 61: | ||
=== Retouching zenith and nadir in one go === | === Retouching zenith and nadir in one go === | ||
<br> | <br> | ||
| − | Here you see the remapped panorama opened in Photoshop. The yellow circles | + | Here you see the remapped panorama opened in Photoshop. The yellow circles mark zenith and nadir as nearly flat regions.<br> |
It is now much easier to retouch these regions.<br> | It is now much easier to retouch these regions.<br> | ||
<br> | <br> | ||
| Line 73: | Line 73: | ||
Open the retouched panorama again in PTGui with the same values under '''''Lens Settings''''' and '''''Panorama Settings'''''.<br> | Open the retouched panorama again in PTGui with the same values under '''''Lens Settings''''' and '''''Panorama Settings'''''.<br> | ||
Fill in the yellow highlighted values under '''''Yaw''''' and '''''Roll'''''.<br> | Fill in the yellow highlighted values under '''''Yaw''''' and '''''Roll'''''.<br> | ||
| − | The '''''Warped''''' view changes imediately to the | + | The '''''Warped''''' view changes imediately to the original projection.<br> |
<br> | <br> | ||
[[Image:PTGUIret_010.jpg]]<br> | [[Image:PTGUIret_010.jpg]]<br> | ||
| Line 82: | Line 82: | ||
<br> | <br> | ||
[[Image:PTGUIret_011.jpg]]<br> | [[Image:PTGUIret_011.jpg]]<br> | ||
| − | If you want the best possible quality follow the next steps | + | If you want the best possible quality, follow the next steps. Otherwise you are done here.<br> |
<br> | <br> | ||
<br> | <br> | ||
| Line 89: | Line 89: | ||
== Merging with most quality == | == Merging with most quality == | ||
| − | Open the retouched, spherical pano in Photoshop and take a look at layer palette.<br> | + | Open the retouched, spherical pano in Photoshop and take a look at the layer palette.<br> |
| − | Drag and drop background layer over '''''new layer''''' icon to make a copy of it:<br> | + | Drag and drop the background layer over the '''''new layer''''' icon to make a copy of it:<br> |
<br> | <br> | ||
[[Image:PTGUIret_012.jpg]]<br> | [[Image:PTGUIret_012.jpg]]<br> | ||
| Line 96: | Line 96: | ||
<br> | <br> | ||
<br> | <br> | ||
| − | Here you can see an additional layer as copy of the | + | Here you can see an additional layer as copy of the background.<br> |
| − | Now drag and drop background layer over '''''recycle bin''''' at the bottom of the<br> | + | Now drag and drop background layer over the '''''recycle bin''''' icon at the bottom of the<br> |
layer palette to delete it:<br> | layer palette to delete it:<br> | ||
<br> | <br> | ||
| Line 104: | Line 104: | ||
<br> | <br> | ||
<br> | <br> | ||
| − | Rename the existing layer to '''''zenith and nadir''''' by double clicking | + | Rename the existing layer to '''''zenith and nadir''''' by double clicking its layer name:<br> |
<br> | <br> | ||
[[Image:PTGUIret_014.jpg]]<br> | [[Image:PTGUIret_014.jpg]]<br> | ||
| Line 110: | Line 110: | ||
<br> | <br> | ||
<br> | <br> | ||
| − | Choose '''''Marquee Tool''''' and | + | Choose the '''''Marquee Tool''''' and change the feather width to 40:<br> |
<br> | <br> | ||
[[Image:PTGUIret_015.jpg]]<br> | [[Image:PTGUIret_015.jpg]]<br> | ||
| Line 117: | Line 117: | ||
<br> | <br> | ||
Set the grid under '''''Edit > Preferences > Guides, Grids & Slices > Gridline every''''' to '''50%'''<br> | Set the grid under '''''Edit > Preferences > Guides, Grids & Slices > Gridline every''''' to '''50%'''<br> | ||
| − | and '''''Subdivison''''' to '''1'''. Left | + | and '''''Subdivison''''' to '''1'''. Left click the grid cross in the middle of the pano and drag the selection<br> |
| − | square to the most right side by holding '''''Alt''''' key until it looks like the image below and then release left<br> | + | square to the most right side by holding '''''Alt''''' key until it looks like the image below and then release the left<br> |
mouse button:<br> | mouse button:<br> | ||
<br> | <br> | ||
| Line 128: | Line 128: | ||
<br> | <br> | ||
[[Image:PTGUIret_017.jpg]]<br> | [[Image:PTGUIret_017.jpg]]<br> | ||
| − | To delete the rectangle selection press Ctrl+D.<br> | + | To delete the rectangle selection, press Ctrl+D.<br> |
<br> | <br> | ||
<br> | <br> | ||
<br> | <br> | ||
<br> | <br> | ||
| − | Open the original pano. | + | Open the original pano. Switch to the retouched pano and press '''''Ctrl+A''''' to select the whole image.<br> |
| − | Change to '''''Move Tool''''' and | + | Change to '''''Move Tool''''' and drag and drop the retouched pano over the original<br> |
pano by holding '''''Shift''''' key to align it proper.<br> | pano by holding '''''Shift''''' key to align it proper.<br> | ||
<br> | <br> | ||
| Line 141: | Line 141: | ||
<br> | <br> | ||
<br> | <br> | ||
| − | Now | + | Now you can see two layers in the original file, the original background layer and<br> |
| − | on top the dropped layer.<br> | + | on top of that, the dropped layer.<br> |
<br> | <br> | ||
[[Image:PTGUIret_019.jpg]]<br> | [[Image:PTGUIret_019.jpg]]<br> | ||
| Line 154: | Line 154: | ||
<br> | <br> | ||
<br> | <br> | ||
| − | You are done now but don't forget to save the panorama with a different name:<br> | + | You are done now, but don't forget to save the panorama with a different name:<br> |
<br> | <br> | ||
[[Image:PTGUIret_021.jpg]]<br> | [[Image:PTGUIret_021.jpg]]<br> | ||
Revision as of 11:03, 22 April 2006
General
Here I show you a fast way to retouch zenith and nadir in one go.
Use this method only if you have a proper stitched panorama and only
the top (zenith) and bottom (nadir) areas need some retouching.
Otherwise use other technics as described under
Extracting and inserting rectilinear Views and How to use PTEditor.
Workflow
Remap to zenith and nadir view
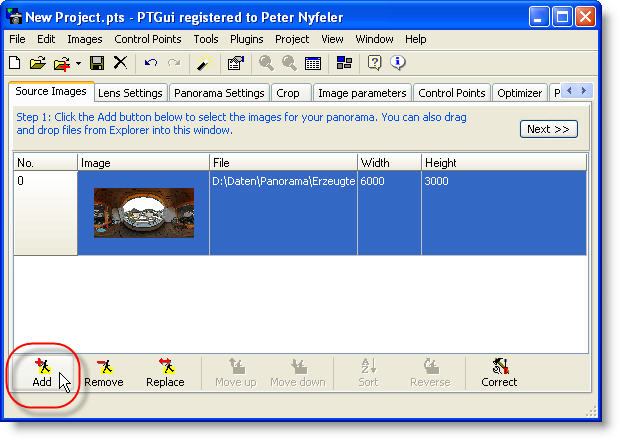
Open PTGui and add one spherical panorama. As you can see the source pano is 6000 x 3000 pixels in size:
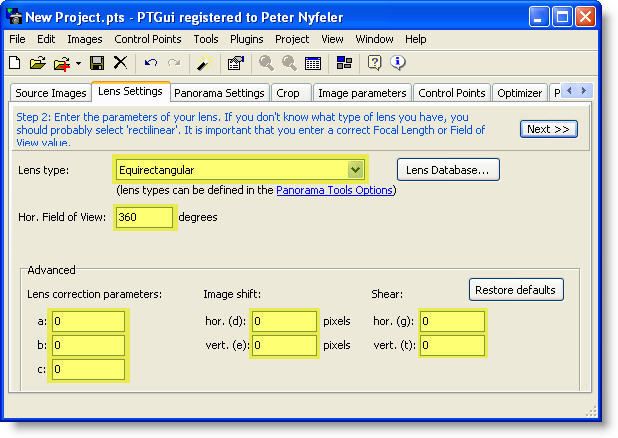
On the Lens Setting tab add the yellow highlighted values:
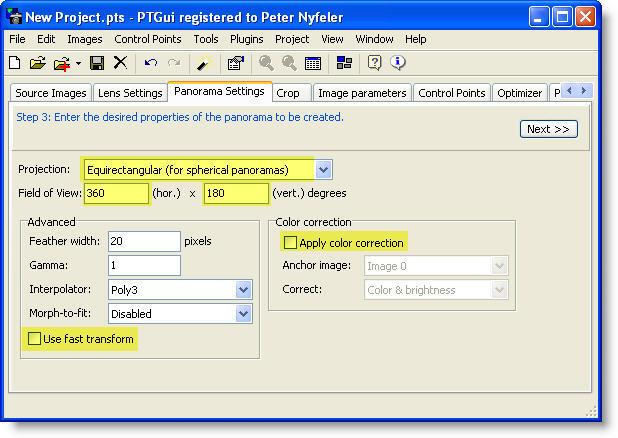
On the Panorama Settings tab add the yellow highlighted values:
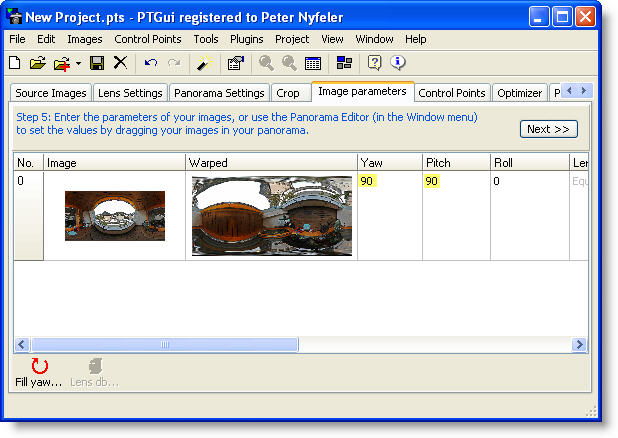
On the Image parameters tab add the yellow highlighted values and you can immediately see the remapping of the image:
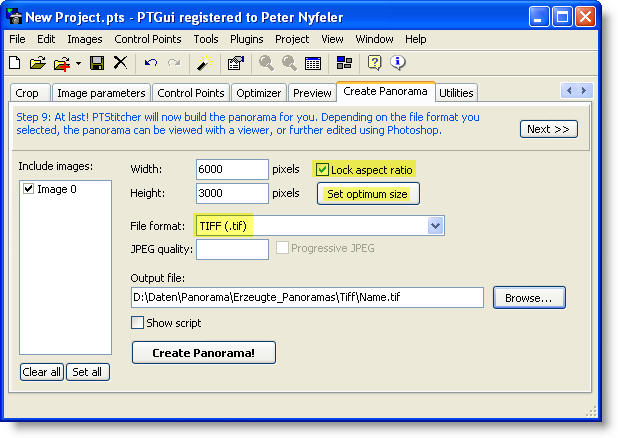
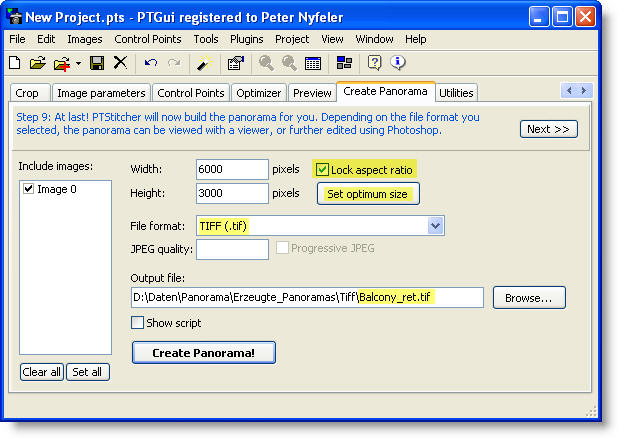
Enable Lock aspect ratio, press Set optimum size button and compare the values with the original size of the panorama.
Choose as output file format TIFF (.tif) for fewer quality loss. Press Create Panorama! to start the remapping process:
You don't have to add control points and optimize in this case, so press OK.

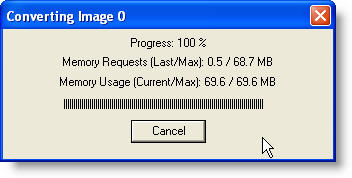
Now you can see the familiar progress bar of Panotools:
Retouching zenith and nadir in one go
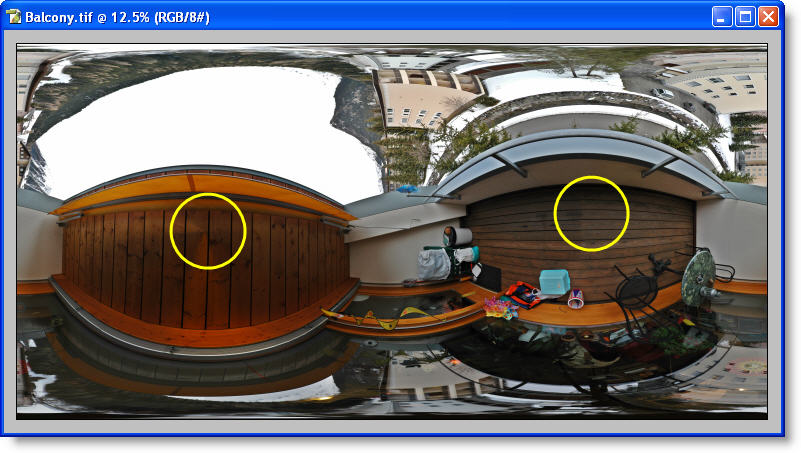
Here you see the remapped panorama opened in Photoshop. The yellow circles mark zenith and nadir as nearly flat regions.
It is now much easier to retouch these regions.
Remapping back to normal view
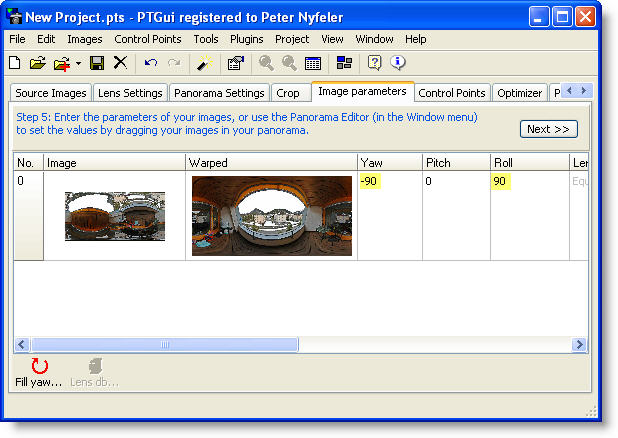
Open the retouched panorama again in PTGui with the same values under Lens Settings and Panorama Settings.
Fill in the yellow highlighted values under Yaw and Roll.
The Warped view changes imediately to the original projection.
Change the values as below, alter output file name to your needs and press Create Panorama!
If you want the best possible quality, follow the next steps. Otherwise you are done here.
Merging with most quality
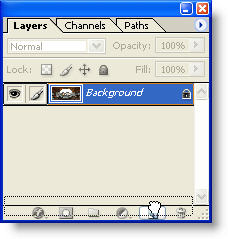
Open the retouched, spherical pano in Photoshop and take a look at the layer palette.
Drag and drop the background layer over the new layer icon to make a copy of it:
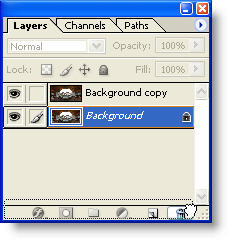
Here you can see an additional layer as copy of the background.
Now drag and drop background layer over the recycle bin icon at the bottom of the
layer palette to delete it:
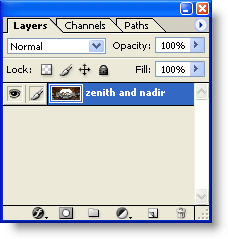
Rename the existing layer to zenith and nadir by double clicking its layer name:
Choose the Marquee Tool and change the feather width to 40:

Set the grid under Edit > Preferences > Guides, Grids & Slices > Gridline every to 50%
and Subdivison to 1. Left click the grid cross in the middle of the pano and drag the selection
square to the most right side by holding Alt key until it looks like the image below and then release the left
mouse button:
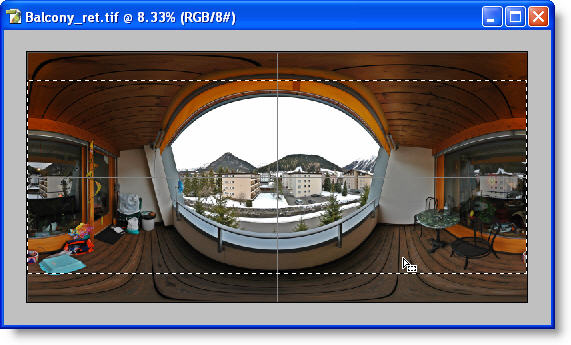
Press Delete key that only zenith and nadir region of the retouched pano will stay:
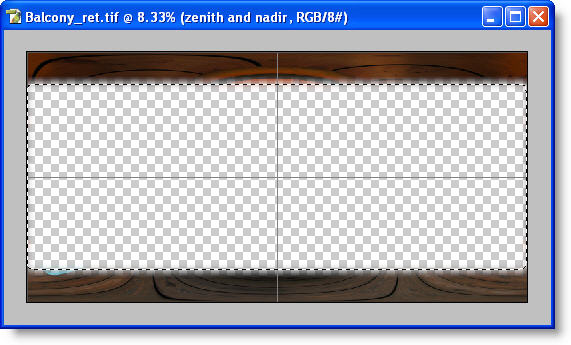
To delete the rectangle selection, press Ctrl+D.
Open the original pano. Switch to the retouched pano and press Ctrl+A to select the whole image.
Change to Move Tool and drag and drop the retouched pano over the original
pano by holding Shift key to align it proper.
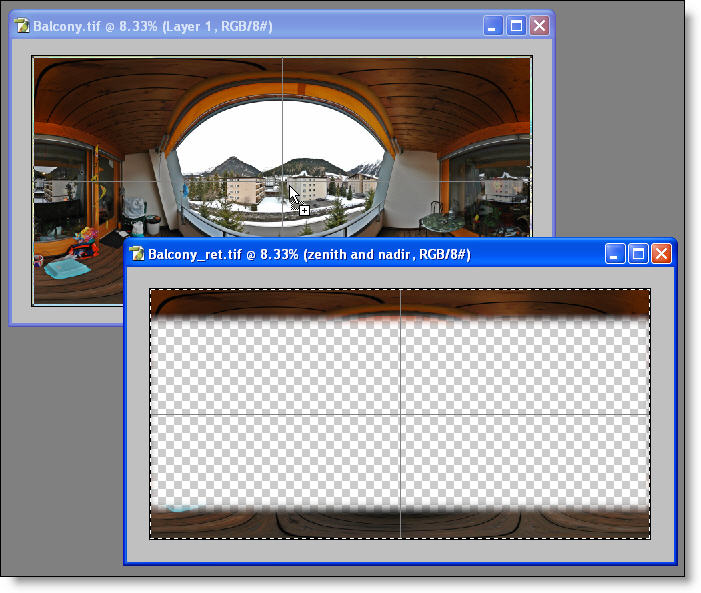
Now you can see two layers in the original file, the original background layer and
on top of that, the dropped layer.
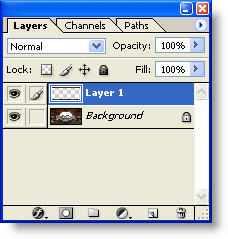
Flatten these layers to background under Layer > Flatten Image :

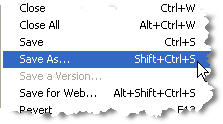
You are done now, but don't forget to save the panorama with a different name:
Peter Nyfeler (Pitdavos)