User:Dmakreshanski/GSOC-overview-proposal
Adding more intuitiveness to the process of creating panorama images in Hugin
Jacobs University Bremen
Campus Ring 1
28759 Bremen
Germany
Date: April 6, 2010
Abstract
The process of automatic stitching multiple shots taken from various angles and positions is without doubt a significantly complex and broad procedure. Therefore, a software which implements this functionality must provide a user interface which will be appealing to both experts and beginners in the field. Hugin's user interface has recently improved drastically with the OpenGL based fast preview, which was basically a OpenGL version of the old preview with some new cool features. The purpose of this project is to use OpenGL as tool for modeling 3D scenes and visualize the intermediate steps of creating the panorama, that is the panosphere and the theoretical plane in normal and mosaic mode respectively. This visualization serves primarily to provide a meaningful overview of the panorama, and a more fancy user interface. For experienced users it will give a nice overview to explore the panorama and check optimization results without changing output parameters, and for beginners it will provide a self explanatory interface to what is going on under the hood, and will help them understand the nature of the projections.
About me
My name is Darko Makreshanski and I am currently a final year bachelor student studying Electrical Engineering and Computer Science at Jacobs University in Bremen, Germany. My major interests are the computer science part of robotics (artificial intelligence, machine learning, computer vision, etc) and information systems. After these bachelor studies I will continue to master studies at the Swiss Federal Institute of Technology in Zürich (ETHZ).
Coding
My main coding platform currently is Ubuntu 9.10, and a Windows Vista as dual boot and Windows XP on a virtual machine. My current machine is a Thinkpad T61 notebook (Intel Core 2 Duo @ 2.4GHz, 2GB RAM, NVidia Quadro NVS 140m).
I have worked with C/C++ in several courses and projects in and outside the university. My latest project in C++ is a framework for the Avahi Zeroconf implementation, which provides a high level, object oriented API for Avahi. This project is still in progress, and for evaluation purposes I have uploaded it to http://rapidshare.com/files/373230640/avahi-framework.tar.gz. I also have already worked with OpenGL in a related visualization course at my university.
Photography
My interests in photography have primarily originated in high school when I had extensive physics practice for competitions, and so from the interest in geometric and physical optics my passion for photography was born.
I currently own a Canon EOS 1000D, and before that I had a digital point and shoot Fuji. I have been photographing panoramas since I discovered Hugin couple of years ago. Some samples of panoramas and other general images I have taken are available at http://dmakreshanski.deviantart.com
Hugin and panotools
I have recently checked out and compiled hugin and the related panotools code. I have also gone through the code of the fast preview prior to writing this proposal during the discussion on the mailing list.
Currently I am also using panotools code for my bachelor's thesis. I am investigating a method for registration of terrestrial laser scans based on SIFT features on the images generated from the reflectance values where am using panotools implementation for extraction and matching of SIFT features.
Motivation
As a photo stitching software, Hugin incorporates a vast set of smaller programs which all combined make Hugin a fairly complex software. Therefore, the user interface is crucial for the user group without background knowledge in the various techniques like map projections, photo manipulations, etc. One motivation for this project is to add intuitiveness to the user for the process of projecting the panorama. Thus, the panosphere is a great invariant and intuitive representation of the panorama that is a starting point for all projections. So, visualizing the panosphere is a great method for explaining the nature of the map projections and the distortions involved.
Also recently Hugin has been upgraded with a technique to stitch mosaic (linear) panoramas, however this method is far from intuitive even for intermediate users. Thus, visualizing the theoretical plane and the panosphere would automatically explain this to the users and encourage them to use this method for linear panoramas.
Another major motivation is that currently the fast preview offers only the preview of the output and a lot of current and future features that are to be made to the fast preview must work on a preview of the output and not on a representation of the panorama itself. For example, for the layout mode it does not make sense to be dependent on the type of projection and on the FOV of the output, and it makes more sense to be included in a panosphere overview rather than in the output projection preview. Also for example the current manipulation of the 3D orientation parameters (yaw, pitch, roll) in the drag mode is not only unintuitive but also not very user friendly as 3D manipulation is presented in 2D coordinates. This would also make more sense if manipulated on the panosphere.
Deliverables
Overview (panosphere)
Visualization of the panosphere
The panorama in the overview will be visualized in such a way that the visual field of the photographer will be represented as a sphere. This sphere could be viewed either from inside or outside. The only difference between these views are only the position of the virtual camera in OpenGL, and thus having both will require minimum effort. The inside view will provide an overview of the panorama as the regular panorama viewers like QTVR, panoglview, etc. The outside view will be the default view, and provide a general interactive overview of the panorama. The visualization of the sphere would be consisted of the following features:
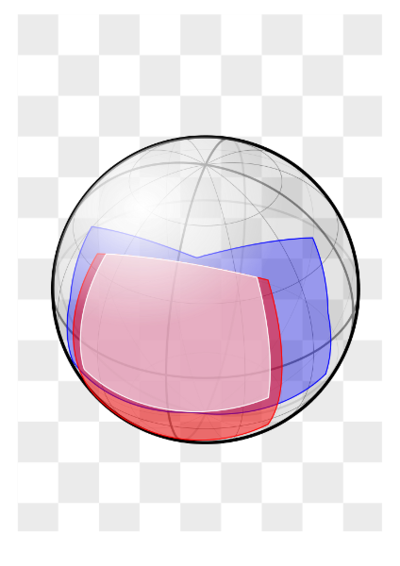
- All active images will be mapped onto the sphere, along with their outlines. Following the idea from James Legg from the related discussion images will follow the same z-order as in the projection window. Back faces of the images will be culled, to prevent parts on the back side of the sphere to appear in front of the front side of the sphere. For the sake of having back faces a second pass of images will be mapped with lower z-order. These second pass images will have front faces culled and will be faded to distinguish when the user is looking at the inner part or the outer part of the sphere.
- sphere background The whole sphere would be colored with a semi-transparent color to increase the intuition for the users that they are looking into a sphere.
- The sphere will be mapped with a grid with spectrum colors that will match to a grid that will also be displayed in the projection canvas
- The outlines for the current canvas rectangle and the current crop rectangle will be mapped as well to the sphere.
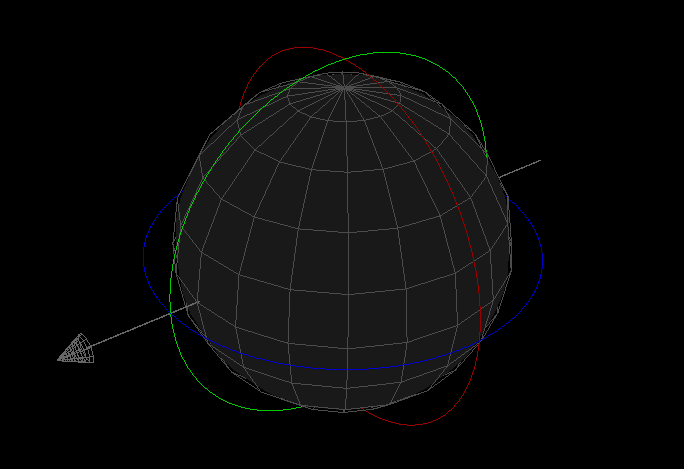
- A set of 3 circles with a radius slightly larger than the radius of the sphere will be drawn. Each circle will correspond to one of the rotation axis: yaw, pitch and roll.
Interaction with the overview
The camera will always have a fixed orientation toward the center of the sphere, and will always have fixed FOV. Changing the camera's state will be done in 3 axes. 2 axes will be for yaw and pitch of the position of the camera with respect to the sphere's center, and one axis will be for the camera's distance from the center of the sphere. The 2 axis for position will be managed in two ways. One would be when the user drags while holding the middle click, and other would be when the user drags while holding the left click, which will occur only when the user doesn't click on an interactive feature like for example the sphere itself. The axis for the distance of the sphere would be handled primarily with the mouse wheel.
interacting with the panosphere
Basically, most of the parts on the sphere and the sphere itself will be interactive. Dragging and rotating the sphere and the images on it would work similarly as in the projection mode with the exception that it can also be done with the specific circles for each axis.
One thing that will be added to both the preview and overview modes is that while dragging (rotating), users will be notified and will be able to choose which image group they are modifying. The information and the commands about the image groups will be displayed along with the image buttons which serve to activate/deactivate specific images.
Other interactive features for the panosphere would be similar to those in the projection mode. For example, the identify tool, the layout mode, control points, etc.
Preview (projection)
The preview (projection) mode will stay mostly the same, with some additions. The biggest additions will be the already mentioned colorful projection grid, and the better handling of image groups.
Projection grid
The projection grid would be displayed both in the overview and the preview. The purpose of the grid is to provide a correspondence between the panosphere and the projection which should give a intuitive explanation for the nature of the map projections and the distortions involved. This projection grid have a different color for every section of the grid. The purpose of this is to provide a fully exact correspondence.
The mosaic (linear) mode
The mosaic mode that currently is supported by hugin is inconsistent with the panosphere as a concept and with some features of the projections. For this reason, a special mode of operation for both the overview and the preview is proposed
Overview in the mosaic mode
Since the linear mode is theoretically consisted of two intermediate steps, that is the hypothetical plane and the panosphere, then showing only the panosphere is not enough to explain this mode. Therefore the plane as well will have to be displayed to explain and provide overview for this mode.
Thus, the overview in this case will be consisted of two separate canvases:
- one canvas will be a modified version of the overview in the normal mode and will show both the panosphere and the plane, however in this canvas neither the panosphere nor the plane will be interactive.
- and another canvas will show an interactive version of the plane.
- the navigation in this canvas will be different than in the panosphere. In this case the camera will be always perpendicular to the plane, and the 3D Cartesian coordinates of the camera will be adjusted.
- the interaction with the images will be similar as in the panosphere, with the exception that in this case instead of adjusting the orientation of the images and image groups, the translation parameters will be adjusted. Thus, the second canvas with the plane would actually be very similar to rectilinear projection of the scene with the distinction that the user will not modify the projection canvas, but browse through an overview.
Preview in the mosaic mode
The major distinction between the preview in the mosaic mode will be that the user will not adjust the orientation parameters while dragging, but will adjust translation parameters
User Interface
The user interface of this system has not been discussed so far in the mailing list, so what is about to be proposed will certainly go for a discussion on the mailing list before is considered.
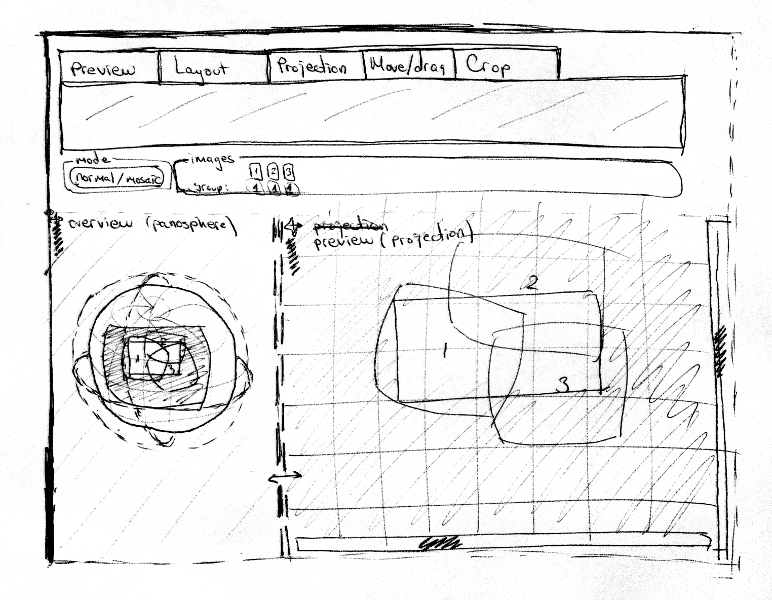
Basically, the projection and overview will be included in separated GL canvases. Also the position/size/docking state will be adjustable for every GL canvas, which will allow for the user to have for example the overview and the preview docked in one window with adjustable border, or have them separated in different screens or monitors.
The controls of the fast preview will stay the same, since most of them will affect both the overview and the preview.
The visualization settings for the overview and preview, like for example the grid density, will be handled in a separate preferences window.
One scenario of the user interface is shown in figure [#fig:gui 4]
Animations
Although there might not be time in this project for implementing every part of this section in the GSOC projection, the whole animations part will be considered while designing the architecture of the system. The animations involved are basically divided in two separate parts:
Projection/mode changing transitions
One type of animations which is an idea by Bruno Postle on the mailing list, is animated transitions between changing projections and switching from and to layout mode.
Animation of projections
Another type of animations are animations of the projections. This type of animations will require a more significant amount of time than the previous type, and it may not or may be partially implemented in the project and will be left to be further developed after GSOC. It basically consists of creating animations that will animate transition from a panosphere to a projection. This will require a separate animation algorithm for different sets of projections, and will be shown in a separate window/canvas. Its purpose is strictly educational, to provide eye catching explanations of the map projections.
Methodology
One of the biggest problems in this project is the visualization of the panosphere. This part has been discussed in the mailing list along with James Legg, and the results of the discussions are in the following section.
Visualization of the panosphere
Since the panosphere will be presented in 3D in OpenGL, and the current system supplies direct 2D projections to OpenGL, some conversions must take place. The major idea is to take equirectangular projections of the images and transform the Cartesian coordinates from the output into spherical coordinates on the destination sphere. To avoid problems with the nadir and zenith, the orientation parameters will be set to zero for all images before projections and considered afterwards.
The depth buffer of OpenGL will not be used so as to prevent z-fight between the meshes. This results in the problem that images on back of the sphere may be rendered in front of some images on the front of the sphere. The solution to this problem involves rendering all images twice and is explained in [#sec:vispanoimg 3.1.1]. This imposes the restriction that everything that needs to be rendered in the scene must be a mesh with one side culled, so that rendering back sides are avoided.
Timeline
- 15.05.10
- University obligations end and full time work for the project begin.
- 25-30.05.10
- Strict deadline for the design of the architecture of the system.
- 30.06.10
- Panosphere visualization completed
- 10.07.10
- Interface for panosphere integrated with fast preview
- 31.07.10
- Mosaic mode for the overview completed
- 01-09.08.10
- Improve system, implement additional features, (parts of the animations section, etc)
- 09-16.08.10
- Improve code quality, write documentation, etc
- 20.08.10
- Final evaluation deadline
- 16.08-15.09.10
- Using remaining free time until the begin of school obligations to improve the system, add remaining features, etc.
I am planning to work in most cases more than 40 hours per week, since I will assume weekends also as work days. I will be unavailable for a few days at the beginning of June (4th-7th) due to graduation ceremony and traveling to home. I may also be unavailable for about a week in July, when I might take a nice summer holiday in the beautiful lake Ohrid.


