Difference between revisions of "Remove tripod shadows"
Tksharpless (talk | contribs) |
Tksharpless (talk | contribs) |
||
| (16 intermediate revisions by 2 users not shown) | |||
| Line 1: | Line 1: | ||
| − | + | Most panographers know how to use an additional "nadir shot" to replace the image of a tripod, but somehow it seems more difficult to eliminate the shadows of the tripod, pole, and photographer. However, this can be done by applying exactly the same principle: combine several shots in which the shadows are in different places. | |
| − | If all images are taken from a fixed lens position, the shadow of the camera itself must be at the same place in all of them. But we can move the shadow of the support, simply by moving the support. This is easiest if the camera is mounted on a telescoping monopod or pole, but can be done with a conventional tripod as well. | + | If all images are taken from a fixed lens position, the shadow of the camera itself must be at the same place in all of them. But we can move the shadow of the support, simply by moving the support. This is easiest if the camera is mounted on a telescoping monopod or pole, but can be done with a conventional tripod as well. When the camera shadow is sufficiently far away, it is possible to get a completely clean patch by shifting the camera slightly to one side of the panocenter. |
| − | As in all other aspects of photography, the key to success is visualizing problems before shooting, and planning ways around them. First, you must be aware of the direction of the light that is making the shadows. You will need to move things at right angles to that direction in order to to shift the shadows. | + | As in all other aspects of photography, the key to success is visualizing problems before shooting, and planning ways around them. First, you must be aware of the direction of the light that is making the shadows. You will need to move things at right angles to that direction in order to to shift the shadows. Shoot from a spot that gives you enough room to maneuver yourself and your equipment, and if possible puts the camera shadow either far away, or in a dark place, perhaps inside some natural shadow. |
| − | When taking the fixed shots from panocenter, take care that your own shadow is not in any of them; or when that is not possible -- for example when shooting from a hand-supported pole or using | + | When taking the fixed shots from panocenter, take care that your own shadow is not in any of them; or when that is not possible -- for example when shooting from a hand-supported pole or using manual shutter release -- take the view in which your shadow appears twice, once standing to the left of the camera and once standing to the right. |
| − | To take | + | To take 'shadow patch' shots, slant the support off to the side (at right angles to the light) while keeping the lens as nearly as possible at panocenter and pointed at the shadow area. This is easiest with a pole, especially one that rests on the ground. In that case you can get a pretty stable shooting position by extending the pole enough to compensate for the slant. for example: |
slant 15 degrees: no compensation needed; | slant 15 degrees: no compensation needed; | ||
slant 30 degrees: 1/6 of the distance you move the foot; | slant 30 degrees: 1/6 of the distance you move the foot; | ||
slant 45 degrees: 2/5 of the distance you move the foot. | slant 45 degrees: 2/5 of the distance you move the foot. | ||
| − | If using a tripod, extend its center column as much as possible for the fixed shooting. Then fold the legs and | + | If using a tripod, extend its center column as much as possible for the fixed shooting. Then fold the legs and handle it like a pole. You will need more slant than with a pole, to let the camera see past the tripod's shoulders. It may be feasible to extend the legs, but I usually just hold it up in the air. |
Before moving the support, sight on a couple of reference points to help you judge lens position, and tighten the lock screw on your rotator if using one. | Before moving the support, sight on a couple of reference points to help you judge lens position, and tighten the lock screw on your rotator if using one. | ||
| − | Sometimes the same shot can serve as both nadir patch and shadow patch, but it is best to take them separately, optimizing each for its particular function. In fact it is a good plan to take | + | Sometimes the same shot can serve as both nadir patch and shadow patch, but it is best to take them separately, optimizing each for its particular function. In fact it is a good plan to take at least two shadow patches. It is easier to align two small patches than one big one; but more important, in a single shot you can easily have part of your shadow where part of the tripod shadow was -- it isn't there anymore, so it's hard to tell. If you take two, standing on opposite sides of the shadow area, with the pole slanted in opposite directions, you are far more likely to get patches that cover everything. |
| − | When stitching, handle your shadow patches like a nadir patch. Enable viewpoint optimization. Make sure all control points are near the shadow region, and more or less on one plane. That does not have to be a horizontal plane, or even a flat surface, in fact just picking points roughly equidistant from the camera also works well. Mask out all shadows in the fixed images, mask the patch images completely, then | + | When stitching, handle your shadow patches like a nadir patch. Enable viewpoint optimization. Make sure all control points are near the shadow region, and more or less on one plane. That does not have to be a horizontal plane, or even a flat surface, in fact just picking points roughly equidistant from the camera also works well. Mask out all shadows in the fixed images, mask the patch images completely, then clear the masks only where needed to fill the gaps. |
| − | |||
| − | == Example 1: hand | + | == Example 1: monopod supported by hand == |
| − | + | 180 degree fisheye lens on a small camera mounted on a light monopod, equipped with a bubble level, standing on a rock. It was early morning, so the shadows of me, the pole and camera extend a long way into the water. | |
| − | + | [[File: Rocks-shadows.jpg|700px|center]] | |
| + | |||
| + | The basic shooting pattern was just 4 shots around, but I took the view in the direction of the shadow twice, once standing to the left of the camera and once to the right. Then I moved to the left and held the pole at a flat slant to to shoot a combined shadow and nadir patch (photos cropped and contrast enhanced to make the shadows easier to see). | ||
| + | |||
| + | [[File: Rocks-stitched.jpg|350px|center]] | ||
| + | |||
| + | Before stitching I masked out the shadows and the top of the monopod in all images, and masked all but the relevant part of the patch image. The last picture shows that part of the stitched panorama. | ||
| + | |||
| + | You can see the interactive version [http://www.360cities.net/image/bright-rocks-narragansett-bay#352.60,0.50,77.5 here]. | ||
== Example 2: pole supported by tripod == | == Example 2: pole supported by tripod == | ||
| − | 15mm fisheye lens on a 1.6 crop DSLR mounted on a | + | 15mm fisheye lens on a 1.6 crop DSLR mounted on a pole that rotates on its own ball-jointed foot. For the fixed shots (6 around down 55 degrees; 8 around level; 6 around up 55 degrees) the pole was supported by a medium-weight tripod via a plastic spring clip that lets me separate the pole from the tripod with a firm pull. |
| + | |||
| + | [[File:Shadows.jpg|600px|center]] | ||
| + | |||
| + | Left, the down view in the direction of the shadow. Several other down and two level views also show the shadow. Center, shadow patch shot from the left. Right, shadow patch shot from the right. A separate nadir patch was also taken. | ||
| − | + | [[File:patch_0.jpg|340px|center]] | |
| + | |||
| + | Before stitching, I painted masks over all shadows and images of myself and the support. After stitching the shadows were gone, and I just had to clone out two tiny unpatched areas at the nadir and on the bottom fence rail. | ||
| − | + | The full size interactive panorama is [http://tksharpless.net/FlashPanos/30thStreet-6AM.html here]. | |
| − | + | [[Category:Tutorial:Nice to know]] | |
Latest revision as of 20:04, 1 December 2012
Most panographers know how to use an additional "nadir shot" to replace the image of a tripod, but somehow it seems more difficult to eliminate the shadows of the tripod, pole, and photographer. However, this can be done by applying exactly the same principle: combine several shots in which the shadows are in different places.
If all images are taken from a fixed lens position, the shadow of the camera itself must be at the same place in all of them. But we can move the shadow of the support, simply by moving the support. This is easiest if the camera is mounted on a telescoping monopod or pole, but can be done with a conventional tripod as well. When the camera shadow is sufficiently far away, it is possible to get a completely clean patch by shifting the camera slightly to one side of the panocenter.
As in all other aspects of photography, the key to success is visualizing problems before shooting, and planning ways around them. First, you must be aware of the direction of the light that is making the shadows. You will need to move things at right angles to that direction in order to to shift the shadows. Shoot from a spot that gives you enough room to maneuver yourself and your equipment, and if possible puts the camera shadow either far away, or in a dark place, perhaps inside some natural shadow.
When taking the fixed shots from panocenter, take care that your own shadow is not in any of them; or when that is not possible -- for example when shooting from a hand-supported pole or using manual shutter release -- take the view in which your shadow appears twice, once standing to the left of the camera and once standing to the right.
To take 'shadow patch' shots, slant the support off to the side (at right angles to the light) while keeping the lens as nearly as possible at panocenter and pointed at the shadow area. This is easiest with a pole, especially one that rests on the ground. In that case you can get a pretty stable shooting position by extending the pole enough to compensate for the slant. for example:
    slant 15 degrees: no compensation needed;
    slant 30 degrees: 1/6 of the distance you move the foot;
    slant 45 degrees: 2/5 of the distance you move the foot.
If using a tripod, extend its center column as much as possible for the fixed shooting. Then fold the legs and handle it like a pole. You will need more slant than with a pole, to let the camera see past the tripod's shoulders. It may be feasible to extend the legs, but I usually just hold it up in the air.
Before moving the support, sight on a couple of reference points to help you judge lens position, and tighten the lock screw on your rotator if using one.
Sometimes the same shot can serve as both nadir patch and shadow patch, but it is best to take them separately, optimizing each for its particular function. In fact it is a good plan to take at least two shadow patches. It is easier to align two small patches than one big one; but more important, in a single shot you can easily have part of your shadow where part of the tripod shadow was -- it isn't there anymore, so it's hard to tell. If you take two, standing on opposite sides of the shadow area, with the pole slanted in opposite directions, you are far more likely to get patches that cover everything.
When stitching, handle your shadow patches like a nadir patch. Enable viewpoint optimization. Make sure all control points are near the shadow region, and more or less on one plane. That does not have to be a horizontal plane, or even a flat surface, in fact just picking points roughly equidistant from the camera also works well. Mask out all shadows in the fixed images, mask the patch images completely, then clear the masks only where needed to fill the gaps.
Example 1: monopod supported by hand
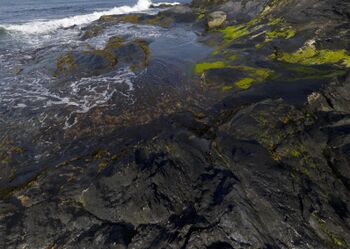
180 degree fisheye lens on a small camera mounted on a light monopod, equipped with a bubble level, standing on a rock. It was early morning, so the shadows of me, the pole and camera extend a long way into the water.
The basic shooting pattern was just 4 shots around, but I took the view in the direction of the shadow twice, once standing to the left of the camera and once to the right. Then I moved to the left and held the pole at a flat slant to to shoot a combined shadow and nadir patch (photos cropped and contrast enhanced to make the shadows easier to see).
Before stitching I masked out the shadows and the top of the monopod in all images, and masked all but the relevant part of the patch image. The last picture shows that part of the stitched panorama.
You can see the interactive version here.
Example 2: pole supported by tripod
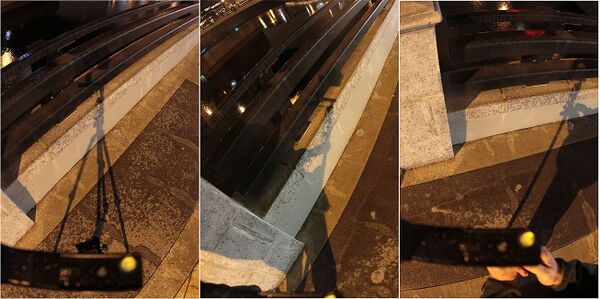
15mm fisheye lens on a 1.6 crop DSLR mounted on a pole that rotates on its own ball-jointed foot. For the fixed shots (6 around down 55 degrees; 8 around level; 6 around up 55 degrees) the pole was supported by a medium-weight tripod via a plastic spring clip that lets me separate the pole from the tripod with a firm pull.
Left, the down view in the direction of the shadow. Several other down and two level views also show the shadow. Center, shadow patch shot from the left. Right, shadow patch shot from the right. A separate nadir patch was also taken.
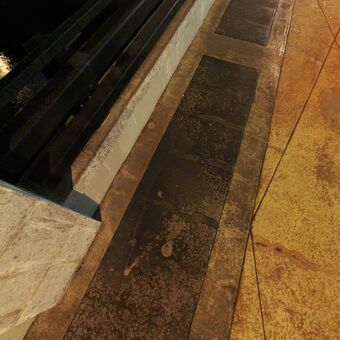
Before stitching, I painted masks over all shadows and images of myself and the support. After stitching the shadows were gone, and I just had to clone out two tiny unpatched areas at the nadir and on the bottom fence rail.
The full size interactive panorama is here.


