RAW dynamic range extraction
RAW dynamic range extraction
Intro
Sometimes it's not feasible or not recommended to shoot bracketed. Action scenes and large crowds f.e. or landscapes in windy weather, where lots of leafs and branches are moving.
This is a small tutorial on how to extract the full dynamic range of a RAW camera file into a single 16 bit per channel document using Adobe camera RAW (ACR) converter of photoshop CS6 (same engine as Lightroom 5).
Extracting the whole dynamic range is a snap in recent ACR. No need to fiddle with low contrast anymore, like described in the old article for photoshop CS2. The Highlights, Shadows and other sliders provide tonemapping-like adjustment and recovery of almost all data that is in the RAW file, making virtual bracketing virtually unnecessary.
Shooting
Shooting for maximum dynamic range implies exposing such that no important highlights are clipped, since clipped data is lost forever. But it would be best to expose as high as possible in order to pull as much shadow details out of the noise floor as well. This is known as Expose-to-the-right or ETTR since 2003.
The range of brightness values in relation to the sensor is usually displayed as a histogram. But that is a bit of a problem on most cameras. The histogram display and clipping indicators show the situation for jpegs, not for raw (only some Leicas use raw histograms when shooting raw). Jpeg highlight clipping is 1 or 2 EV lower than raw clipping. If you rely on those, you expose too low and details get lost in shadow noise. In camera inspection of raw images doesn't help either, since the display uses the same clipping as for jpegs.
However, there is help:
- The most recent builds (as of June 2013) of Magic Lantern, a firmware extension for Canon EOS cameras, allows for raw histograms and other exposure helpers for raw shooting (namely raw zebras and ETTR helpers).
- Unitary White Balance (UniWB) is a way to trick the jpeg histogram into showing correct values. See tutorial by Guillermo Luijk.
- UniWB can also be achieved with Magic Lantern stable release v2.3
With raw zebras it is easiest to expose correctly, since all clipped highlights are marked with a zebra pattern. But raw histogram and clipping indicators are of incredible help, too. The result might look overexposed, but this is easily fixed during raw conversion and you will find incredible shadow details in the images.
Load all the images the panorama consists of into ACR and press "Select All".
Settings
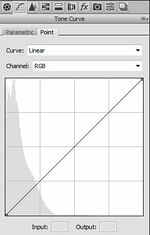
Choose a linear curve on the Tone Curve tab. All Contrast curves will make highlights and shadows details less distinguishable and worsen clipping.
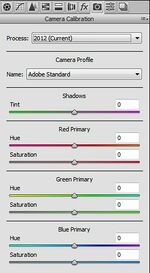
Choose Process: 2012 from Camera Calibration tab. Older processes introduce much more clipping. In my tests Adobe Standard Camera Profile allowed for least highlight clipping.
Now you can start to adjust the Exposure slider such that your images start to look good. Don't keep too much attention to shadows and highlights in this step.
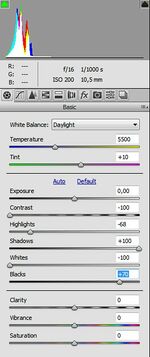
On Basic tab press the O and U key in order to activate Shadow and Highlight clipping warning. The small indicators in the upper corners of the histogram need to show a white border. Clipped highlights are shown as red area in the image, clipped shadows blue.
Select the image with most highlights for display by Alt-clicking on it (in order to keep all images selected). Move the Highlights slider to the left until the indicator in the top right corner turns black. This is the exact point where there will be no highlight clipping any more. You might want to leave specular highlights (or the sun) clipped.
Select the image with most shadows for display by Alt-clicking on it. The Shadows slider needs to be moved to the right in order to lighten shadows. If the indicator in the top left corner turns black there is no shadow clipping any more. Colored indicators show which color channel is clipped.
If this is not enough to recover all dynamic range and your highlights are grey to white (f.e. cloudy sky) you can play with the Whites slider. The Blacks slider helps if the Shadows are dark grey to black.
If you want more visible shadow details pull down (left) the Contrast slider. This will give you a dull image, but you have the possibility to do a local contrast enhancement later.
Other settings
Unfortunately some other settings influence the dynamic range, too.
On Basic tab:
- White Balance In recent versions of ACR this has very little influence on dynamic range.
- Clarity can be used to bring back some local contrast, but be aware: it might re-introduce clipping.
- Vibrance has little influence on clipping, provided you don't overdo it.
- Saturation Speaks for itself. If you increase saturation you decrease dynamic range because the color channels are saturated earlier.
On Detail tab:
- Sharpening might introduce some clipped highlight pixels since it increases contrast along edges. Better to sharpen the result image after contrast adjustment.
- Noise Reduction settings try to reduce noise. They tend to eliminate single clipped pixels but don't impact over all dynamic range.
On HSL / Grayscale and Split Toning tab:
- Use the settings carefully if you need them.
On Lens Corrections tab:
- Vignetting (Manual sub-tab) This might influences the dynamic range, since it changes pixel brightness in the corners. However, since vignetting normally is a darkening of the image corners you only limit the dynamic range in the corners to the same level as in the image center if you pull the slider up to an appropriate value. If you pull the slider down highlight clipped area gets smaller. Don't think you get higher dynamic range this way. There is simply a certain value subtracted from the pixel values which the clipping indicator does not see as clipped any more. But there is no additional information.
- Remove Chromatic Aberration and Defringe (Profile sub-tab) can (and should) safely be used.
On Effects tab:
- You don't want to use those if you go for maximum dynamic range.
Save Settings
You can save your settings to a preset. However, since dynamic range extraction highly depends from the image content, it's probably better to do it on an individual basis.
Don't forget to switch to 16 bit per channel output and choose TIFF as file format, before you save your images.
How to proceed
What to do now with these files? There are tons of possibilities to enhance the result. You can increase local contrast by simple high radius, low amount unsharp masking or by HDR tonemapping (most tonemappers, including photoshop, work on 16 bit images as well).
Remark
It can not be guaranteed that you can extract the very last bit of information from your RAW this way since we don't exactly know what the RAW converter does. However, it could well be that you get even more dynamic range from the converter than your camera actually captured.
How that? Color channels are not all saturated at the same level. If you f.e. use dcraw without the -n option you apparently get less dynamic range than from most other RAW converters. Dcraw clips the colors to the lowest clipped channel. If you use the -n option (and an appropriate -b value) you get anything the camera captured, including a single clipped channel. This might lead to very strange effects. However, ACR and other raw converters don't suffer from this shortcoming.
According to Dave Coffin (author of dcraw) most other RAW converters try to reconstruct the clipped channel from the other channels. This is why f.e. Adobe Camera RAW sometimes delivers more dynamic range than dcraw in 16 bit mode does.
External links
ETTR
- The original article: http://www.luminous-landscape.com/tutorials/expose-right.shtml
- Signal to noise theory and exposure decisions: http://theory.uchicago.edu/~ejm/pix/20d/tests/noise/noise-p3.html#ETTR
- Good and quick explanation: https://en.wikipedia.org/wiki/Exposing_to_the_right
Unitary white balance
- The original article: http://www.guillermoluijk.com/tutorial/uniwb/index_en.htm
- How to get UniWB faster on POTN: http://photography-on-the.net/forum/showthread.php?t=485349


