Difference between revisions of "RAW dynamic range extraction"
m (5 revision(s)) |
Erik Krause (talk | contribs) m (marked as out of date) |
||
| (7 intermediate revisions by 2 users not shown) | |||
| Line 2: | Line 2: | ||
=== Intro === | === Intro === | ||
| − | This is a small tutorial on how to extract the full [[dynamic range]] of a RAW camera file into a single 16 bit per channel document using Adobe camera RAW converter of photoshop CS2. This workflow might be possible with other RAW converters, too. | + | This is a small tutorial on how to determine settings to extract the full [[dynamic range]] of a RAW camera file into a single 16 bit per channel document using Adobe camera RAW converter of photoshop CS2. This workflow might be possible with other RAW converters, too. |
For a general RAW workflow please see [[Working with RAW files in CS2]] | For a general RAW workflow please see [[Working with RAW files in CS2]] | ||
=== Preparation === | === Preparation === | ||
| − | First we need an example with high dynamic range to find suitable parameters. Since it is very hard to shoot a | + | First we need an example with high dynamic range to find suitable parameters. Since it is very hard to shoot a controlled high dynamic range scene in one image it is advisable to use an exposure [[Bracketing|bracketed]] series for this purpose. |
I've chosen a setup like the one proposed by Ben Kreunen on [http://www.path.unimelb.edu.au/~bernardk/tutorials/360/technical/hdri/] with a white, a grey and a black patch. This setup can be used to determine dynamic range of the camera, too. However, the use of a grey wedge would be better for our purpose. | I've chosen a setup like the one proposed by Ben Kreunen on [http://www.path.unimelb.edu.au/~bernardk/tutorials/360/technical/hdri/] with a white, a grey and a black patch. This setup can be used to determine dynamic range of the camera, too. However, the use of a grey wedge would be better for our purpose. | ||
| Line 49: | Line 49: | ||
On ''Details'' tab: | On ''Details'' tab: | ||
| − | * ''Sharpness'' Sharpening might introduce some clipped highlight pixels since it increases contrast along edges. Better to sharpen the result image after contrast adjustment. | + | * ''Sharpness'' [[Sharpening]] might introduce some clipped highlight pixels since it increases contrast along edges. Better to sharpen the result image after contrast adjustment. |
* ''Luminance Smoothing'' and ''Color Noise Reduction'' try to reduce noise. They tend to eliminate single clipped pixels but don't impact over all dynamic range. | * ''Luminance Smoothing'' and ''Color Noise Reduction'' try to reduce noise. They tend to eliminate single clipped pixels but don't impact over all dynamic range. | ||
| Line 82: | Line 82: | ||
What to do now with these files? You can use a simple s-shaped curve to simulate analog film characteristics, you can use photoshop "Shadows/Highlights" to reveal some of the shadows details. You can use my [[Contrast Masking Actions]] to have a more [[halo]] free result or you can use one of the [[HDR compression]] plugins. | What to do now with these files? You can use a simple s-shaped curve to simulate analog film characteristics, you can use photoshop "Shadows/Highlights" to reveal some of the shadows details. You can use my [[Contrast Masking Actions]] to have a more [[halo]] free result or you can use one of the [[HDR compression]] plugins. | ||
| − | For the latter there are some preparations necessary: Either convert the image to 32 Bit per channel by simply choosing from the menu or convert to a linear gamma color space. How to create a linear gamma color space can be found in the [[Dcraw#16_bit_files_with_Photoshop|dcraw article]]. | + | For the latter there are some preparations necessary: Either convert the image to 32 Bit per channel by simply choosing from the menu or convert to a linear [[gamma]] color space. How to create a linear gamma color space can be found in the [[Dcraw#16_bit_files_with_Photoshop|dcraw article]]. |
=== Remark === | === Remark === | ||
| Line 91: | Line 91: | ||
According to dave coffin (author of dcraw) most other RAW converters try to reconstruct the clipped channel from the other channels. This is why f.e. Adobe Camera RAW sometimes seems to deliver more dynamic range than dcraw in 16 bit mode does. | According to dave coffin (author of dcraw) most other RAW converters try to reconstruct the clipped channel from the other channels. This is why f.e. Adobe Camera RAW sometimes seems to deliver more dynamic range than dcraw in 16 bit mode does. | ||
| + | [[Category:Tutorial:Specialised]] | ||
| + | [[Category:Software:Platform:Windows]][[Category:Software:Platform:Mac OS X]] | ||
| − | + | {{Outdated|Talk}} | |
| − | |||
| − | |||
| − | |||
Revision as of 23:41, 21 September 2008
RAW dynamic range extraction
Intro
This is a small tutorial on how to determine settings to extract the full dynamic range of a RAW camera file into a single 16 bit per channel document using Adobe camera RAW converter of photoshop CS2. This workflow might be possible with other RAW converters, too.
For a general RAW workflow please see Working with RAW files in CS2
Preparation
First we need an example with high dynamic range to find suitable parameters. Since it is very hard to shoot a controlled high dynamic range scene in one image it is advisable to use an exposure bracketed series for this purpose.
I've chosen a setup like the one proposed by Ben Kreunen on [1] with a white, a grey and a black patch. This setup can be used to determine dynamic range of the camera, too. However, the use of a grey wedge would be better for our purpose.
Shoot all images with fixed white balance and manual exposure set to different times. If the necessary exposure time exceeds the cameras possibilities you can vary the f-stop as well but be aware of vignetting if you shoot wide open. Best is to shoot at f/11 or f/16. Indirect lighting is preferable.
Focusing is no issue - in contrary: if you shoot a bit blurred you can use the series to create a specialised noise reduction profile.
I've used a Nikon D70 with a Nikkor 10.5mm fisheye for this test and shot a series of 17 images bracketed with one f-stop difference from 1/8000s at f/16 to 8s at f/16.
Opening files
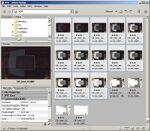
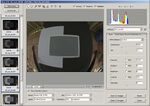
You can open files via Adobe Bridge or with the file open dialog. In our case only files 1 to 13 are used since in 14 to 17 the grey patch is clipped to bright white. Images should show up in the left column of Adobe camera RAW.
Settings
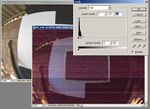
Click the brightest image in left pane and then click Select all button top left. Choose Camera Raw Defaults in the Settings list. In the right pane select the Curve tab page and select Linear as curve type. Settings will change to Custom with this step.
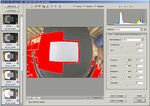
In the top row check Preview, Shadows and Highlights to see clipping on both ends. Then go to the Adjust tab page and set Shadows, Brightness and Contrast to the lowest possible values (leftmost slider position). The bright red area in the preview images indicates clipped highlights.
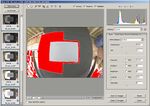
This is perfectly ok but unfortunately there is no difference visible between clipping introduced by the camera and clipping introduced by RAW converter settings. To determine this point draw up and down the exposure slider. There is a point where lowering the exposure does not further decrease the size of the clipped area (a grey wedge would be better here). You can verify the setting with the next darker images. Don't forget to press Select All before you make any adjustments.
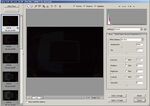
Now go to the darkest image. Since all images where selected it has the same settings as the brightest ones. Probably it will look perfectly black, but the RGB values above the histogram show some - albeit very low - values different from zero. As long as there are no bright blue areas there is no shadow clipping. (You can increase the Shadows slider to see how it might look like).
If there are bright blue areas try to increase the Exposure slider. If the area does not get smaller, this is clipping introduced by the camera. If it gets significantly smaller you have reached the limits of Adobe Camera RAW. Then only dcraw with linear 16 bit output might help.
Other settings
Unfortunately some other settings influence the dynamic range, too.
On Adjust tab:
- White Balance This has a severe influence on dynamic range since white balance is performed by subtracting or adding values on one or more color channels. In my test images from the Nikon D70 clipping didn't change significantly between 4400K and 6500K. This range can be enlarged if you choose lower values for Exposure. Perhaps it is a good idea to do the above steps with images shot under different color temperatures and save settings for typical white balance settings. The more the white balance will differ from the ideal color temperature (should be 5500K for most cameras) the lower will be the usable dynamic range.
- Saturation Speaks for itself. If you increase saturation you decrease dynamic range because the color channels are saturated earlier.
On Details tab:
- Sharpness Sharpening might introduce some clipped highlight pixels since it increases contrast along edges. Better to sharpen the result image after contrast adjustment.
- Luminance Smoothing and Color Noise Reduction try to reduce noise. They tend to eliminate single clipped pixels but don't impact over all dynamic range.
On Lens tab:
- Chromatic Aberration has a very little influence on dynamic range, it might reveal single clipped pixels.
- Vignetting This might influences the dynamic range, since it changes pixel brightness in the corners. However, since vignetting normally is a darkening of the image corners you only limit the dynamic range in the corners to the same level as in the image center if you pull the slider up to an appropriate value. If you pull the slider down highlight clipped area gets smaller. Don't think you get higher dynamic range this way. There is simply a certain value subtracted from the pixel values which the clipping indicator does not see as clipped any more. But there is no additional information.
On Calibrate tab:
- All sliders on this page - especially the saturation sliders might influence dynamic range. If you need to work with other values than 0 for any slider here you should determine the dynamic range values with these settings and save them together with your settings subset. However, since the goal here is to extract full dynamic range and not to get a perfect image directly from RAW converter I suggest to do any color corrections in your final contrast adjusted result image.
Save Settings
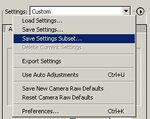
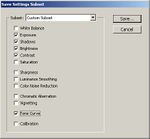
If anything is ok you can go back to the brightest image and save the relevant settings. Choose Save Settings Subset from the menu you get if you click the small triangle button right of the Settings list. From the dialog uncheck all settings but Exposure, Shadows, Brightness, Contrast and Tone Curve (Check other settings if you want to save them together with the subset, of course). Press the Save button and give a speaking name. This name will appear in the camera RAW Settings list.
Usage
The usage is straightforward. Open images with Camera Raw, Select All, Choose settings subset from the Settings list, check Show Workflow Options, choose your desired space and Depth 16 Bits/Channel, press Save or Open button.
Result
To verify that the whole dynamic range the camera is capable of is captured in the result files we open the darkest and the brightest non-clipped image with the above determined settings. The dark image is 10 f-stops below the bright one (and almost 11 f-stops below clipping level) and hast to be lightened extremely in order to see anything. It shows heavy noise of course - noise is the limiting factor for digital camera dynamic range. You probably won't like to use it for anything.
How to proceed
What to do now with these files? You can use a simple s-shaped curve to simulate analog film characteristics, you can use photoshop "Shadows/Highlights" to reveal some of the shadows details. You can use my Contrast Masking Actions to have a more halo free result or you can use one of the HDR compression plugins.
For the latter there are some preparations necessary: Either convert the image to 32 Bit per channel by simply choosing from the menu or convert to a linear gamma color space. How to create a linear gamma color space can be found in the dcraw article.
Remark
It can not be guaranteed that you can extract the very last bit of information from your RAW this way since we don't exactly know what the RAW converter does. However, it could well be that you get even more dynamic range from the converter than your camera actually captured.
How that? Color channels are not all saturated at the same level. If you f.e. use dcraw without the -n option you apparently get less dynamic range than from most other RAW converters. Dcraw clips the colors to the lowest clipped channel. If you use the -n option (and an appropriate -b value) you get anything the camera captured, including a single clipped channel. This might lead to very strange effects.
According to dave coffin (author of dcraw) most other RAW converters try to reconstruct the clipped channel from the other channels. This is why f.e. Adobe Camera RAW sometimes seems to deliver more dynamic range than dcraw in 16 bit mode does.
