Difference between revisions of "Hugin Fast Preview window"
(Added note about this being a new feature - feel free to revert if necessary, I was confused when I saw this page first though.) |
(Show control points) |
||
| Line 39: | Line 39: | ||
When the mouse is on the overlap of two images, click to edit the control points between those images. | When the mouse is on the overlap of two images, click to edit the control points between those images. | ||
| + | |||
| + | ===[[Image:Show_Control_Points_Button.svg]] Show control points=== | ||
| + | When this tool is turned on, you can clearly see all control points which didn't match in the panorama as a long lines from respective positions. It indicates wrong control points (from not matching features) or not optimized images. | ||
==Blend modes== | ==Blend modes== | ||
Revision as of 00:37, 14 October 2009
NOTE This feature is new in the official 0.8.0 release. It was introduced after the previous (0.7.0) release. See hugin release notes.
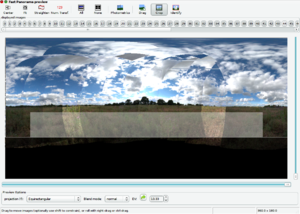
Like the more accurate Hugin Preview window, the fast preview shows something similar to the final stitched output, but with a few important differences:
- Reduced resolution input images are used, so some areas can appear blurred that will be sharp in the final output.
- Seams are not created, images are simply overlaid with the first image at the bottom of the stack and the last at the top.
- Blending by a tool such as enblend isn't shown.
- The brightness display of HDR and 16bit images is controlled by settings in the hugin Preferences, these settings are not used when stitching. The colouring of these images will also be inaccurate when using exposure or white balance correction. For HDR panoramas, the Hugin Preview window is recommended instead.
- Photometric correction only includes white balance and exposure, unless full photometric correction is enabled with the the Photometrics button.
- The remappings are approximate, the output by a tool such as nona is more accurate. If this concerns you more than speed, use the Hugin Preview window instead.
- It's much faster ;-)
hugin
Buttons
Any button appearing in both preview windows works the same, see Hugin Preview window for how to use them. The buttons specific to the fast preview are explained below.
Error creating thumbnail: /bin/bash: line 1: rsvg-convert: command not found Photometrics
Enables full photometric correction. When turned on, this will cause significant delay when changing photometric parameters. It also takes a while to turn on and off. However, with it enabled you get much better representation of the colours in the output. With it turned off, you get correction only for exposure and white balance. With it turned on, you also get vignetting and colour response correction. The Hugin Preview window does all these things by default, so you may wish to use that instead.
Error creating thumbnail: /bin/bash: line 1: rsvg-convert: command not found Drag
Using this tool you can recentre the panorama interactively. With it turned on, try the following:
- Drag the panorama with the left mouse button to rotate the panorama's images. The centre of rotation is the point where you pushed the mouse button down.
- Hold shift when doing the above to constrain movement to yaw or pitch. Note pitch is affected by the centre of rotation.
- Drag the panorama with the right mouse button or hold control and drag with the left to roll the panorama (rotate around the middle)
If the panorama contains unconnected components, they will move individually.
Press the button again to turn it off.
Error creating thumbnail: /bin/bash: line 1: rsvg-convert: command not found Crop
Using this tool you can set the output cropping region interactively. To do this precisely instead, use the Stitcher tab. Initially, the entire panorama is in the output region (i.e. nothing is cropped).
To change the cropping at each edge, move the mouse towards that edge until a white box appears along it, then drag with the left mouse button until the edge is where you want it. The darker areas represent the region that is cropped off. You can move two edges at once by moving the mouse towards the corner shared by the edges until both white boxes appear. If you wish to move the whole region at once, move the mouse into the middle so that all four edges have boxes along them and drag.
Press the button again to turn it off.
Error creating thumbnail: /bin/bash: line 1: rsvg-convert: command not found Identify
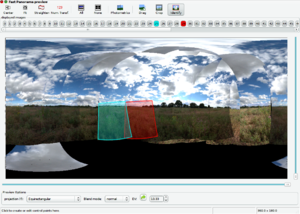
Using this tool you can find where your images are, and match them to their number. You can also edit control points.
When this tool is turned on, move the mouse over the visibility buttons for the images (the numbers at the top of the preview). The image with the number on the button under the mouse lights up red in the preview. Moving the mouse over the panorama highlights all the images under the mouse in different colours. The buttons for those images lights up in matching colours.
When the mouse is on the overlap of two images, click to edit the control points between those images.
Error creating thumbnail: /bin/bash: line 1: rsvg-convert: command not found Show control points
When this tool is turned on, you can clearly see all control points which didn't match in the panorama as a long lines from respective positions. It indicates wrong control points (from not matching features) or not optimized images.
Blend modes
The normal blend mode will draw the images as a stack. The difference blend mode will do the same, except the image under the mouse pointer will be subtracted from the rest of the stack. Use this to determine if the alignment went well: where you can see edges in the subtracted image, these edges are misaligned. Be warned that this isn't fully accurate, the other preview has a better difference mode.
In practice
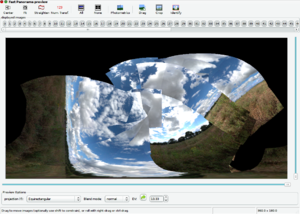
Let's try using this preview to help with a panorama where automatic alignment failed. This panorama was taken where a lot of things were blowing around in the wind, and the clouds were changing quickly, so it is not surprising that it aligning it is a struggle. The Assistant tab tells us there are multiple unconnected image groups. We can optimise the panorama and end up with a images correctly positioned amongst the group they are in, but the groups themselves are not aligned. Try this first.
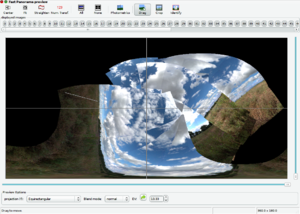
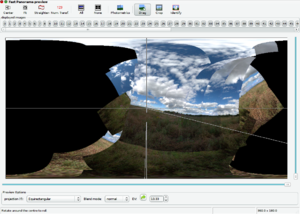
Using the Drag tool, we can roughly align the groups together:
- Turn on the tool with the Drag button.
- Drag each component so the horizon is in the middle, using the left mouse button.
- Drag with the right mouse button (or hold control and drag with the left) to level the horizon.
- Hold shift and drag with the left mouse button sideways to approximately line up the image with the other groups.
When we have the images in approximately the right position, we can begin placing control points to guide the optimiser. The Identify tool lends a hand here. Firstly, turn on the identify tool. Move the mouse on an overlap that was recently created between two image groups. The images in the overlap light up. Move the mouse to a place where there is only two images in that overlap, and click. The two images are opened in the control point editor (there may be a short pause while the images are loaded). Once you have placed control points manually, you can return to the preview to find some more image pairs.
When you are happy that your panorama contains sufficient control points, optimise it again. The panorama will likely have the horizon at the wrong angle, in this case press Straighten on the preview window. You can then frame the panorama using the drag tool (hold shift so you don't make it wonky again!). Use your artistic judgement here. If you want to crop your panorama, click Crop and drag the edges of the cropping rectangle.
