Difference between revisions of "Historical:How to use PTEditor"
Erik Krause (talk | contribs) m (categorized) |
|||
| (8 intermediate revisions by 4 users not shown) | |||
| Line 1: | Line 1: | ||
| − | 1. The whole thing is easier | + | 1. The whole thing is easier than it looks like at first! |
| − | 2. PTEditor (pteditor.jar) is | + | 2. [[PTEditor]] (pteditor.jar) is found in the [[Panorama Tools]] (I use version 2.6b1) |
3. Make a shortcut to the desktop and be aware of spaces in the root. | 3. Make a shortcut to the desktop and be aware of spaces in the root. | ||
| Line 11: | Line 11: | ||
| − | 5. Under | + | 5. Under Menu '''''File''''' click to '''''open''''' panorama and choose the desired equirectangular panorama (possible formats : [[TIFF]], [[JPEG]], [[PNG]], [[BMP]]) |
[[Image:pte_tutorial_002.jpg]] | [[Image:pte_tutorial_002.jpg]] | ||
| Line 17: | Line 17: | ||
| − | 6. When the file is opened, navigate with mouse or keyboard arrows to the region who needs retouching. (The navigation is similar to PTViewer) | + | 6. When the file is opened, navigate with mouse or keyboard arrows to the region who needs retouching. (The navigation is similar to [[PTViewer]]) |
| − | + | Shift + leftmouseclick=> zoom in | |
| − | + | Ctrl + leftmouseclick => zoom out | |
| − | 7.When you have zoomed in enough (really important, because this way the | + | 7.When you have zoomed in enough (really important, because this way the extracted file isn't that big in size), choose '''''Extract Partial View''''' under menu '''''Edit'''''. |
[[Image:pte_tutorial_003.jpg]] | [[Image:pte_tutorial_003.jpg]] | ||
| Line 30: | Line 30: | ||
| − | 8. A Dialog opens | + | 8. A Dialog opens to let you save this partial view. Default setting is '''''Image.tif''''' |
| − | (I always | + | (I always keep this name as is and save the newer views over it, only to get rid of to much |
trash on my computer) | trash on my computer) | ||
| Line 38: | Line 38: | ||
| − | 9. When | + | 9. When saved, open this file in a image editor software like [[Photoshop]], [[gimp]] and so on and retouch it. |
The final file should be flattened to background after retouching. Save and close the partial panorama file. | The final file should be flattened to background after retouching. Save and close the partial panorama file. | ||
| − | 10. The retouched '''''Image.tif''''' can now be re-inserted. Go back to PTEditor window and choose | + | 10. The retouched '''''Image.tif''''' can now be re-inserted. Go back to [[PTEditor]] window and choose |
| − | '''''Insert saved View''''' under | + | '''''Insert saved View''''' under menu '''''Edit'''''.The retouched part (Image.tif) will be inserted in a few seconds. |
[[Image:pte_tutorial_005.jpg]] | [[Image:pte_tutorial_005.jpg]] | ||
| Line 56: | Line 56: | ||
| − | 12. Repeat the steps number 7 to 10 as much as you like | + | 12. Repeat the steps number 7 to 10 as much as you like until the whole panorama is retouched. |
| − | I think this is one of the easiest ways to retouch a panorama, also in zenith and nadir regions. No remapping is needed that causes quality (8 bit workflow). | + | I think this is one of the easiest ways to retouch a panorama, also in zenith and nadir regions. No remapping is needed that causes loss of quality (8 bit workflow). |
| Line 79: | Line 79: | ||
| − | This is really | + | This is really useful, when you have to add a special starting position in [[PanoCube]] or [[Pano2QTVR]]. |
| − | '''Attention:''' Sometimes you have to hit the key twice | + | '''Attention:''' Sometimes you have to hit the key twice to show this dialog on the |
bottom border. | bottom border. | ||
| − | The used version of pano12 | + | The used version of [[pano12]] in this workflow is ''''''2.7.0.6'''''' |
| + | == How to allocate enough RAM for [[PTEditor]] == | ||
| − | + | With big sized panoramas [[PTEditor]] tends to do nothing because of too little allocated RAM. | |
| − | |||
| − | |||
| − | |||
| − | With big sized panoramas PTEditor tends to do nothing because of too | ||
To avoid this just read the following tutorial: | To avoid this just read the following tutorial: | ||
| Line 99: | Line 96: | ||
<br> | <br> | ||
--[[User:Pitdavos|Peter Nyfeler]] (Pitdavos) | --[[User:Pitdavos|Peter Nyfeler]] (Pitdavos) | ||
| + | |||
| + | [[Category:Tutorial:Basic need]] | ||
Revision as of 20:07, 21 March 2007
1. The whole thing is easier than it looks like at first!
2. PTEditor (pteditor.jar) is found in the Panorama Tools (I use version 2.6b1)
3. Make a shortcut to the desktop and be aware of spaces in the root.
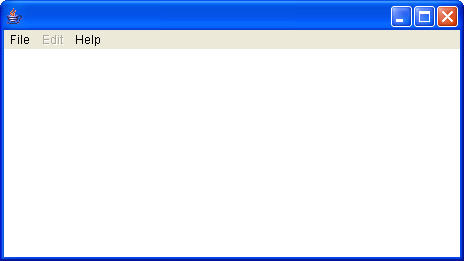
4. Doubleclick the icon and it should look like this:
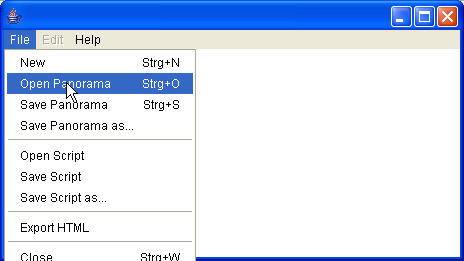
5. Under Menu File click to open panorama and choose the desired equirectangular panorama (possible formats : TIFF, JPEG, PNG, BMP)
6. When the file is opened, navigate with mouse or keyboard arrows to the region who needs retouching. (The navigation is similar to PTViewer)
Shift + leftmouseclick=> zoom in
Ctrl + leftmouseclick => zoom out
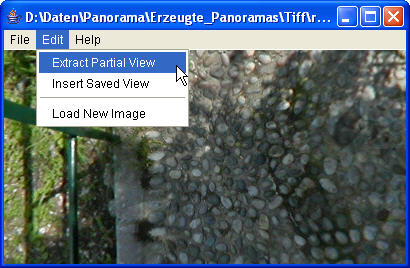
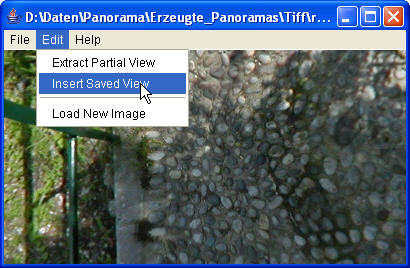
7.When you have zoomed in enough (really important, because this way the extracted file isn't that big in size), choose Extract Partial View under menu Edit.
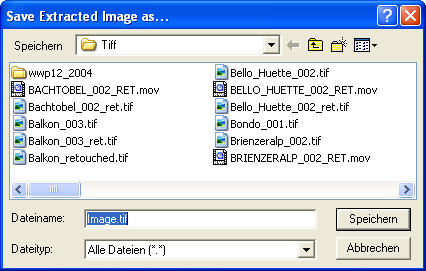
8. A Dialog opens to let you save this partial view. Default setting is Image.tif (I always keep this name as is and save the newer views over it, only to get rid of to much trash on my computer)
9. When saved, open this file in a image editor software like Photoshop, gimp and so on and retouch it.
The final file should be flattened to background after retouching. Save and close the partial panorama file.
10. The retouched Image.tif can now be re-inserted. Go back to PTEditor window and choose
Insert saved View under menu Edit.The retouched part (Image.tif) will be inserted in a few seconds.
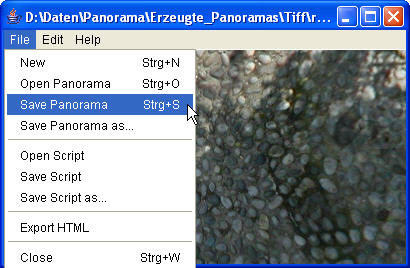
11. Don't forget to save the modified panorama:
12. Repeat the steps number 7 to 10 as much as you like until the whole panorama is retouched.
I think this is one of the easiest ways to retouch a panorama, also in zenith and nadir regions. No remapping is needed that causes loss of quality (8 bit workflow).
Additional functions:
A. By pressing the key i, you get used version on the bottom border:
B. By pressing the key v; you get the actual position where you navigated to:
This is really useful, when you have to add a special starting position in PanoCube or Pano2QTVR.
Attention: Sometimes you have to hit the key twice to show this dialog on the bottom border.
The used version of pano12 in this workflow is '2.7.0.6'
How to allocate enough RAM for PTEditor
With big sized panoramas PTEditor tends to do nothing because of too little allocated RAM. To avoid this just read the following tutorial:
How to allocate enough RAM for PTEditor
--Peter Nyfeler (Pitdavos)
