Difference between revisions of "HDR compression"
Erik Krause (talk | contribs) m (linkified) |
Erik Krause (talk | contribs) m (marked as out of date) |
||
| (14 intermediate revisions by 4 users not shown) | |||
| Line 1: | Line 1: | ||
| − | + | {{Glossary|The compression of the [[dynamic range|Dynamic Range]] in order to be displayed on a low dynamic range device like monitor or printer.}} | |
| + | With [[Photoshop]] CS2 it has become very easy to create true [[HDR]] (high [[dynamic range]]) images from [[Bracketing|bracketed]] exposure series. There is a nice tutorial by Brian Greenstone on how to assemble multiple exposures into one HDR file: [http://www.panomundo.com/panos/howto/workflow_expbracketing.html] | ||
| − | + | He describes the necessary steps to compress the high dynamic range with photoshop built in "Local Adaption", too. However, sometimes it is very hard to get decent results this way. Two HDR compression plugins are now available for this purpose. '''[[Photomatix]] Tone Mapping''' plugin from HDRSoft and '''FDRCompressor''' from [[FDRTools]]. | |
| − | |||
| − | + | Both plugins can be used on 16 or 8 bit per channel images, too. See [[RAW dynamic range extraction]] on how to extract the full dynamic range of a RAW file into a single 16 bit file. | |
I just played a bit with both plugins, so please don't expect the best possible results. May be someone with more experience can give better instructions. | I just played a bit with both plugins, so please don't expect the best possible results. May be someone with more experience can give better instructions. | ||
| Line 12: | Line 12: | ||
Many thanks to Raanan Fattal for letting me use his Belgium House HDR image: [http://www.cs.huji.ac.il/~danix/hdr/results.html] | Many thanks to Raanan Fattal for letting me use his Belgium House HDR image: [http://www.cs.huji.ac.il/~danix/hdr/results.html] | ||
| − | + | == FDRCompressor == | |
[[Image:fdr-dialog.jpg|thumb|300px|FDRCompressor plugin]] | [[Image:fdr-dialog.jpg|thumb|300px|FDRCompressor plugin]] | ||
[[Image:belgium-fdr.jpg|thumb|300px|FDRCompressor result - Image courtesy of Raanan Fattal]] | [[Image:belgium-fdr.jpg|thumb|300px|FDRCompressor result - Image courtesy of Raanan Fattal]] | ||
| Line 24: | Line 24: | ||
* '''Black''' determines the black point setting. The value should be gradually increased until the preview (left pane) does not show further substantial dimout. In normal cases good values lie between 1 and 10.<br>'''Note:''' values too high are bad as this maps too many pixels to the same value which results in loss of detail. | * '''Black''' determines the black point setting. The value should be gradually increased until the preview (left pane) does not show further substantial dimout. In normal cases good values lie between 1 and 10.<br>'''Note:''' values too high are bad as this maps too many pixels to the same value which results in loss of detail. | ||
| − | * ''' | + | * '''360°Pano''' wraps the image around in order to avoid seams at the 0°/360° boundary if checked. |
If the image comes out a bit flat with low contrast, this is because it is still 32 bit per channel and has to be reduced to 16 or 8 bit and the black and white point have to be set. The black and white point adjustment is best done in L*a*b color space in order to preserve color saturation. | If the image comes out a bit flat with low contrast, this is because it is still 32 bit per channel and has to be reduced to 16 or 8 bit and the black and white point have to be set. The black and white point adjustment is best done in L*a*b color space in order to preserve color saturation. | ||
| − | In this case no white and black point setting was necessary. The general appearance is good. No visible [[halo | + | In this case no white and black point setting was necessary. The general appearance is good. No visible [[halo]]s, detail contrast is ok, no reversed gradients, no artifacts.{{clr}} |
| − | + | == Photomatix Tone Mapping == | |
[[Image:photomatix-dialog.jpg|thumb|300px|Photomatix Tone Mapping]] | [[Image:photomatix-dialog.jpg|thumb|300px|Photomatix Tone Mapping]] | ||
[[Image:belgium-photomatix.jpg|thumb|300px|Photomatix result - Image courtesy of Raanan Fattal]] | [[Image:belgium-photomatix.jpg|thumb|300px|Photomatix result - Image courtesy of Raanan Fattal]] | ||
| − | The plugin opens with a dialog where 8 parameters can be adjusted. From the help file: | + | The [[Photomatix]] plugin opens with a dialog where 8 parameters can be adjusted. From the help file: |
* '''Luminosity''' Adjusts the brightness of the shadows and the amount of local contrast enhancement. Moving the slider to the right has the effect of boosting shadow details and brightening the image. Moving it to the left gives a more natural look to the tone mapped image. <br>The optimal value depends on the dynamic range of the image. | * '''Luminosity''' Adjusts the brightness of the shadows and the amount of local contrast enhancement. Moving the slider to the right has the effect of boosting shadow details and brightening the image. Moving it to the left gives a more natural look to the tone mapped image. <br>The optimal value depends on the dynamic range of the image. | ||
| Line 48: | Line 48: | ||
* '''Microcontrast''' Sets how much local details are accentuated.<br>The default value (High) is the optimal value in most cases. However, a lower value may be useful in the case of a noisy image or when the accentuation of local details is not desirable (e.g. seams of a stitched pano in a uniform area may become visible when local details are too much enhanced). In those cases, it is recommended to move the "Luminosity" slider to the left once you have set a lower value for the Microcontrast. | * '''Microcontrast''' Sets how much local details are accentuated.<br>The default value (High) is the optimal value in most cases. However, a lower value may be useful in the case of a noisy image or when the accentuation of local details is not desirable (e.g. seams of a stitched pano in a uniform area may become visible when local details are too much enhanced). In those cases, it is recommended to move the "Luminosity" slider to the left once you have set a lower value for the Microcontrast. | ||
| − | * ''' | + | * '''360° image''' This option needs to be checked when the image processed is an equirectangular image set to be viewed as a 360° panorama. Given that the tone mapping takes into account local contrast, the 360° seams of an equirectangular image will be assigned different tonal values, which will result in a visible seam once the tone mapped image is rendered in a panorama viewer. Checking this option will correct for this.<br> This option should only be checked for equirectangular 360° images. Checking it in other cases may produce less optimal results. |
The image comes out with good contrast - white and black point settings are apparently done by the '''White Clip''' and '''Black Clip''' values. It is in 32 bit per channel mode too and has to be reduced to 16 or 8 bit. "Equalize Histogram" does not give better results here. | The image comes out with good contrast - white and black point settings are apparently done by the '''White Clip''' and '''Black Clip''' values. It is in 32 bit per channel mode too and has to be reduced to 16 or 8 bit. "Equalize Histogram" does not give better results here. | ||
| Line 54: | Line 54: | ||
The general appearance is pretty good at the first glance, with good contrast for the outside scene and no reversed gradients. | The general appearance is pretty good at the first glance, with good contrast for the outside scene and no reversed gradients. | ||
| − | At a closer look it shows little artifacts and some [[halo | + | At a closer look it shows little artifacts and some [[halo]]s - the door frame is too dark where the bright column is behind. If you look at http://www.hdrsoft.com/ this could be a general problem of photomatix. The result resembles a bit the [http://www.cs.huji.ac.il/~danix/hdr/pages/belgium.html original Gradient Domain HDR compression result] of Fattal, Lischinski and Werman. |
{{clr}} | {{clr}} | ||
| − | + | == Conclusion == | |
The two plugins are very powerful tools for compression of real high dynamic range images like it would not have been possible only short time ago. They can compete with the most recent research on that topic. | The two plugins are very powerful tools for compression of real high dynamic range images like it would not have been possible only short time ago. They can compete with the most recent research on that topic. | ||
| Line 63: | Line 63: | ||
The results are very similar, both have been sharpened slightly (the source images are a bit blurry). It is meaningless to compare the differences in contrast in my example - they most likely can be avoided or enhanced by choosing better parameters. More experience is needed here. | The results are very similar, both have been sharpened slightly (the source images are a bit blurry). It is meaningless to compare the differences in contrast in my example - they most likely can be avoided or enhanced by choosing better parameters. More experience is needed here. | ||
| − | What is hardly avoidable by parameters are [[halo | + | What is hardly avoidable by parameters are [[halo]]s and artifacts. The Photomatix result shows some of them: Dark [[halo|halos]] around the door and on the door frame. Light halos around the plant leaves left and above the window in the opposite wall. A coarse structure in uniform areas of the inside wall, especially left and above the door. |
The FDRCompressor result does not show those flaws. The only critics from my side would be that it is harder to master than photomatix. The response if you change values is slow and the values are not intuitive. Preview is too small and does often not resemble the final result. | The FDRCompressor result does not show those flaws. The only critics from my side would be that it is harder to master than photomatix. The response if you change values is slow and the values are not intuitive. Preview is too small and does often not resemble the final result. | ||
| Line 73: | Line 73: | ||
<small>--[[User:Erik Krause|Erik Krause]] 16:06, 9 Dec 2005 (EST)</small> | <small>--[[User:Erik Krause|Erik Krause]] 16:06, 9 Dec 2005 (EST)</small> | ||
| − | + | [[Category:Tutorial:Specialised]] | |
| − | + | [[Category:Software:Platform:Windows]] | |
[[Category:Glossary]] | [[Category:Glossary]] | ||
| + | [[Category:Software:Survey]] | ||
| + | |||
| + | {{Outdated}} | ||
Latest revision as of 23:37, 21 September 2008
With Photoshop CS2 it has become very easy to create true HDR (high dynamic range) images from bracketed exposure series. There is a nice tutorial by Brian Greenstone on how to assemble multiple exposures into one HDR file: [1]
He describes the necessary steps to compress the high dynamic range with photoshop built in "Local Adaption", too. However, sometimes it is very hard to get decent results this way. Two HDR compression plugins are now available for this purpose. Photomatix Tone Mapping plugin from HDRSoft and FDRCompressor from FDRTools.
Both plugins can be used on 16 or 8 bit per channel images, too. See RAW dynamic range extraction on how to extract the full dynamic range of a RAW file into a single 16 bit file.
I just played a bit with both plugins, so please don't expect the best possible results. May be someone with more experience can give better instructions.
Both plugins are currently only available for Windows, both have announced a Mac OSX version very soon. And both are available as stand alone programs for both Mac OSX and windows.
Many thanks to Raanan Fattal for letting me use his Belgium House HDR image: [2]
FDRCompressor
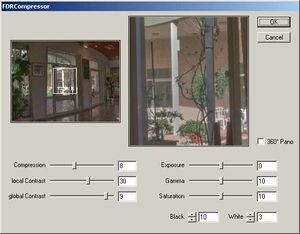
The plugin opens with a dialog where 9 parameters can be adjusted. However, according to [3] only 5 of them are relevant for most images (text taken from the page):
- Compression controls the strength of tonal value range compression and is most important among all parameters. Higher dynamic range requires stronger compression. Values between 1 and 5 work best for RAW images while HDR scenes may require values up to 10.
- global Contrast provides a possibility to influence image contrast in excess of what 'Compression' already does. For scenes with extreme dynamic range 9 is the right value. Otherwise the default value 8 is very good.
Note: scenes with large areas of equal intensity do not really profit from this contrast boosting. Here values above 8 are not useful.
- Exposure acts like setting the exposure of a camera. The right value for this parameter is determined from the zoom view (right pane). It should be adjusted so that the lighest image areas do not appear overexposed.
- Black determines the black point setting. The value should be gradually increased until the preview (left pane) does not show further substantial dimout. In normal cases good values lie between 1 and 10.
Note: values too high are bad as this maps too many pixels to the same value which results in loss of detail.
- 360°Pano wraps the image around in order to avoid seams at the 0°/360° boundary if checked.
If the image comes out a bit flat with low contrast, this is because it is still 32 bit per channel and has to be reduced to 16 or 8 bit and the black and white point have to be set. The black and white point adjustment is best done in L*a*b color space in order to preserve color saturation.
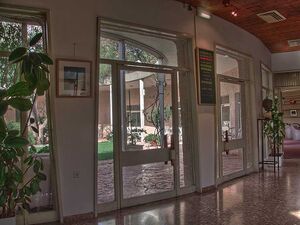
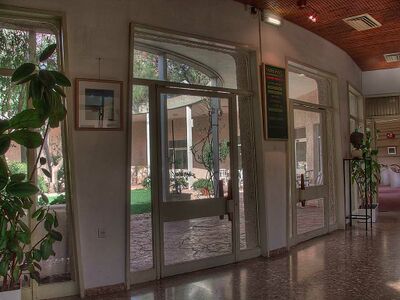
In this case no white and black point setting was necessary. The general appearance is good. No visible halos, detail contrast is ok, no reversed gradients, no artifacts.
Photomatix Tone Mapping
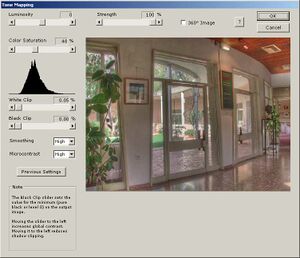
The Photomatix plugin opens with a dialog where 8 parameters can be adjusted. From the help file:
- Luminosity Adjusts the brightness of the shadows and the amount of local contrast enhancement. Moving the slider to the right has the effect of boosting shadow details and brightening the image. Moving it to the left gives a more natural look to the tone mapped image.
The optimal value depends on the dynamic range of the image.
- Strength Controls the strength of local contrast enhancements. A value of 100% gives the maximum increase in local contrast.
The optimal value depends on the image and the effect you want to achieve.
- Color Saturation Controls the saturation of the RGB color channels. The higher the saturation, the more intense the color. The value affects each color channel equally.
The optimal value is a matter of taste. You may need a different value to achieve the same color intensity depending on the image (the dynamic range has an influence on color saturation).
- White Clip - Black Clip Both sliders control how the minimum and maximum values of the output image are set. Moving the sliders to the left increases global contrast. Moving them to the left reduces the clipping at the extremes. The White Clip slider sets the value for the maximum (pure white or level 255). The Black Clip slider sets the value for the minimum (pure black or level 0).
The optimal values depend on the image. You can use the histogram as a guide to the effects of those sliders.
- Smoothing Controls the amount of smoothing of luminance variations. Setting a lower value increases sharpness.
The optimal value depends on the image.
- Microcontrast Sets how much local details are accentuated.
The default value (High) is the optimal value in most cases. However, a lower value may be useful in the case of a noisy image or when the accentuation of local details is not desirable (e.g. seams of a stitched pano in a uniform area may become visible when local details are too much enhanced). In those cases, it is recommended to move the "Luminosity" slider to the left once you have set a lower value for the Microcontrast.
- 360° image This option needs to be checked when the image processed is an equirectangular image set to be viewed as a 360° panorama. Given that the tone mapping takes into account local contrast, the 360° seams of an equirectangular image will be assigned different tonal values, which will result in a visible seam once the tone mapped image is rendered in a panorama viewer. Checking this option will correct for this.
This option should only be checked for equirectangular 360° images. Checking it in other cases may produce less optimal results.
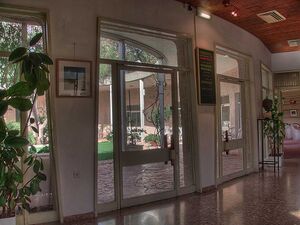
The image comes out with good contrast - white and black point settings are apparently done by the White Clip and Black Clip values. It is in 32 bit per channel mode too and has to be reduced to 16 or 8 bit. "Equalize Histogram" does not give better results here.
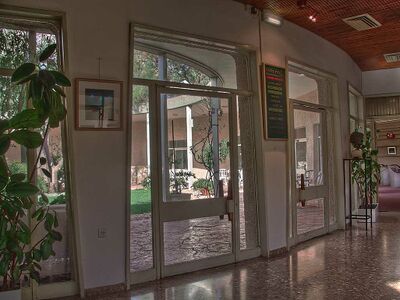
The general appearance is pretty good at the first glance, with good contrast for the outside scene and no reversed gradients.
At a closer look it shows little artifacts and some halos - the door frame is too dark where the bright column is behind. If you look at http://www.hdrsoft.com/ this could be a general problem of photomatix. The result resembles a bit the original Gradient Domain HDR compression result of Fattal, Lischinski and Werman.
Conclusion
The two plugins are very powerful tools for compression of real high dynamic range images like it would not have been possible only short time ago. They can compete with the most recent research on that topic.
The results are very similar, both have been sharpened slightly (the source images are a bit blurry). It is meaningless to compare the differences in contrast in my example - they most likely can be avoided or enhanced by choosing better parameters. More experience is needed here.
What is hardly avoidable by parameters are halos and artifacts. The Photomatix result shows some of them: Dark halos around the door and on the door frame. Light halos around the plant leaves left and above the window in the opposite wall. A coarse structure in uniform areas of the inside wall, especially left and above the door.
The FDRCompressor result does not show those flaws. The only critics from my side would be that it is harder to master than photomatix. The response if you change values is slow and the values are not intuitive. Preview is too small and does often not resemble the final result.
For your convenience here a side by side comparison of the result images:
--Erik Krause 16:06, 9 Dec 2005 (EST)
