Difference between revisions of "Dust Removal with Flatfield"
(text recycling - to be edited) |
(working more on the text) |
||
| Line 1: | Line 1: | ||
Dust can get into camera optics. In panorama images created from such photos the repetitive pattern can be particulary irritating, as a dust speck or a dust speck pattern tends to show up multiple times. | Dust can get into camera optics. In panorama images created from such photos the repetitive pattern can be particulary irritating, as a dust speck or a dust speck pattern tends to show up multiple times. | ||
| + | |||
| + | [[Image:Tuebingen Neckarfront withdustspots small15 2006-06-11.jpg|thumb|600px|Image with dust specks]] | ||
One can prepare a flatfield for correction. While one may correct the input files prior to stitching precessing each with the ''gimp'' for example, a much smoother workflow results if the stitching software itself provides for the use of a flatfield. | One can prepare a flatfield for correction. While one may correct the input files prior to stitching precessing each with the ''gimp'' for example, a much smoother workflow results if the stitching software itself provides for the use of a flatfield. | ||
| − | Flatfields may also be used to correct [[vignetting]], or vignetting correction and dust removal combined. But even with hugin 0.7 using a parametrisation approach for vignetting, a suitably prepared flatfield is useful for dust removal. | + | [[Image:Tuebingen Neckarfront small15 2006-06-11.jpg|thumb|600px|Image without dust specks]] |
| + | |||
| + | Flatfields may also be used to correct [[vignetting]], or vignetting correction and dust removal combined. But even with hugin 0.7 using a parametrisation approach for vignetting, a suitably prepared flatfield is useful for dust removal. | ||
| + | |||
| + | == Example of flatfield performance == | ||
| − | < | + | <gallery> |
| + | Image:Flatfield3 Munich.jpg|Original image | ||
| + | Image:Flatfield1 Munich.jpg|Snapped raw flatfield | ||
| + | Image:Flatfield2 Munich.jpg|Flatfield | ||
| + | Image:Flatfield4 Munich.jpg|Corrected image | ||
| + | </gallery> | ||
| − | + | Leftmost in the gallery a photo with dust in the lense. Here it is rather visible, | |
| − | |||
| − | |||
as my camera sometimes had the habit of showing a focussed image | as my camera sometimes had the habit of showing a focussed image | ||
of the dust specks as well. I have downscaled the images. | of the dust specks as well. I have downscaled the images. | ||
| − | + | ||
Shortly later the camera fell into that habit again, and I had a | Shortly later the camera fell into that habit again, and I had a | ||
whiteboard nearby, so I set the lense aperture to the same value | whiteboard nearby, so I set the lense aperture to the same value | ||
and took a photo of the featureless whiteboard. | and took a photo of the featureless whiteboard. | ||
| − | |||
| − | |||
It is rather dark, but it shows the same dust specks | It is rather dark, but it shows the same dust specks | ||
as the photo I want to correct. | as the photo I want to correct. | ||
| − | + | ||
| − | |||
After some brightness adjustment and blurring (details on request) | After some brightness adjustment and blurring (details on request) | ||
| − | with the gimp | + | with the gimp the thrid images is now the flatfield as used in the layer |
with the mode set to "divide". | with the mode set to "divide". | ||
| − | |||
| − | |||
| − | |||
| − | + | Rightmost the corrected photo. If one looks closely I did not get | |
| − | |||
| − | |||
| − | |||
the flatfield completely right in the upper half of the image, | the flatfield completely right in the upper half of the image, | ||
| − | as the white is blown the dust specks in | + | as the white in the flatfield is blown the dust specks in the sky are under-corrected. |
See in particular the top left corner. with a little more time | See in particular the top left corner. with a little more time | ||
I probably could produce a better flatfield version. But the specks | I probably could produce a better flatfield version. But the specks | ||
on the runway are pretty much gone. | on the runway are pretty much gone. | ||
| − | + | ||
| − | + | This example is shown with a view towards hugin, where in hugin 0.6beta | |
| − | flatfield image was available but | + | flatfield image was available but hugin 0.7beta5 does no longer have it in the GUI. |
| − | does no longer have it in the GUI. In particular within a | + | In particular within a panorama stitch the dust specks have the nasty habit of showing up |
| − | panorama stitch the dust specks have the nasty habit of showing up | ||
several times and forming a repetitive pattern which your eye | several times and forming a repetitive pattern which your eye | ||
is faster to spot than a single spot positioned at random. | is faster to spot than a single spot positioned at random. | ||
| − | + | ||
| + | [[Category: Tutorial:Nice to know]] | ||
Revision as of 20:47, 2 December 2007
Dust can get into camera optics. In panorama images created from such photos the repetitive pattern can be particulary irritating, as a dust speck or a dust speck pattern tends to show up multiple times.

One can prepare a flatfield for correction. While one may correct the input files prior to stitching precessing each with the gimp for example, a much smoother workflow results if the stitching software itself provides for the use of a flatfield.

Flatfields may also be used to correct vignetting, or vignetting correction and dust removal combined. But even with hugin 0.7 using a parametrisation approach for vignetting, a suitably prepared flatfield is useful for dust removal.
Example of flatfield performance
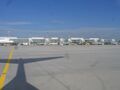
Original image

Snapped raw flatfield

Flatfield

Corrected image


Leftmost in the gallery a photo with dust in the lense. Here it is rather visible, as my camera sometimes had the habit of showing a focussed image of the dust specks as well. I have downscaled the images.
Shortly later the camera fell into that habit again, and I had a whiteboard nearby, so I set the lense aperture to the same value and took a photo of the featureless whiteboard. It is rather dark, but it shows the same dust specks as the photo I want to correct.
After some brightness adjustment and blurring (details on request) with the gimp the thrid images is now the flatfield as used in the layer with the mode set to "divide".
Rightmost the corrected photo. If one looks closely I did not get the flatfield completely right in the upper half of the image, as the white in the flatfield is blown the dust specks in the sky are under-corrected. See in particular the top left corner. with a little more time I probably could produce a better flatfield version. But the specks on the runway are pretty much gone.
This example is shown with a view towards hugin, where in hugin 0.6beta flatfield image was available but hugin 0.7beta5 does no longer have it in the GUI. In particular within a panorama stitch the dust specks have the nasty habit of showing up several times and forming a repetitive pattern which your eye is faster to spot than a single spot positioned at random.