Difference between revisions of "ChristmasBallPanoTutor"
m (linkification) |
m (→The camera: de-apostrophed) |
||
| (8 intermediate revisions by 4 users not shown) | |||
| Line 8: | Line 8: | ||
To make your own christmas ball panorama the way I do it in this tutorial, you'll need a christmas ball, a camera and some software. Read on. | To make your own christmas ball panorama the way I do it in this tutorial, you'll need a christmas ball, a camera and some software. Read on. | ||
==== The camera ==== | ==== The camera ==== | ||
| − | You can of course use a digital camera or you can use an anolog one and scan the results. What matters only, is that you'll probably want to use a camera with some zooming capacity. Since you are photographing a mirror, the camera and | + | You can of course use a digital camera or you can use an anolog one and scan the results. What matters only, is that you'll probably want to use a camera with some zooming capacity. Since you are photographing a mirror, the camera and its tripod (or you) will be in the reflection. The further away the camera is, the less it blocks the view. Also, the larger the Field of View (FoV) of your resulting image will be. |
==== The christmas ball ==== | ==== The christmas ball ==== | ||
| Line 14: | Line 14: | ||
==== Software ==== | ==== Software ==== | ||
| − | I use [ | + | I use Adobe [[Photoshop]] for this tutorial. Basically any version of Adobe Photoshop will work, as long as it supports the [[Panorama Tools Plugins]]. You can perhaps do it just as well with other software than Photoshop. If you do not have it, follow closely what I do and find a way to do it alternatively. Even better, add it your procedure to this tutorial. Of course you need the [[Panorama tools]] too. Optionally you can also use the [[Flexify|Flexify plugin]] from Flaming Pear for the conversion. |
=== Photographing the christmas ball === | === Photographing the christmas ball === | ||
| Line 81: | Line 81: | ||
Note I did not fill it with black, but with purple. Only to show what part was filled up by the canvas size change. | Note I did not fill it with black, but with purple. Only to show what part was filled up by the canvas size change. | ||
| + | |||
| + | Below this line you can see an interactive example of the image above. Drag the mouse in the image to look around, use ctrl and shift to zoom. My christmas ball was far from round, as you can see :( | ||
| + | |||
| + | <center> | ||
| + | <pano file="Christmas_ball_equirectangular_filled.jpg" width="350" height="200" viewer="ptviewer"/> | ||
| + | </center> | ||
=== Saving and viewing the results === | === Saving and viewing the results === | ||
| Line 91: | Line 97: | ||
--[[User:Serge|Serge]] 21:35, 18 Dec 2004 (EST) | --[[User:Serge|Serge]] 21:35, 18 Dec 2004 (EST) | ||
| + | |||
| + | [[Category:Tutorial:Nice to know]] | ||
Revision as of 16:58, 17 April 2012
Creating a panorama from a christmas ball reflection
Intro
One of the cheapest and easiest ways to create a full spherical panorama is by photographing a mirror ball. The easiest source for a mirror ball is probably the collection of christmas balls on your attic, so that is what we are going to use in this tutorial.
Requirements
To make your own christmas ball panorama the way I do it in this tutorial, you'll need a christmas ball, a camera and some software. Read on.
The camera
You can of course use a digital camera or you can use an anolog one and scan the results. What matters only, is that you'll probably want to use a camera with some zooming capacity. Since you are photographing a mirror, the camera and its tripod (or you) will be in the reflection. The further away the camera is, the less it blocks the view. Also, the larger the Field of View (FoV) of your resulting image will be.
The christmas ball
The christmas ball should be as perfectly round as possible to minimize distortion. Of course it should be as reflective and color free as possible, but it also helps a lot if the reflective layer is the top layer of the ball. Using a big ball will give your panorama a better resolution. It will also allow you to position your camera further away from the ball. A tiny ball will generally give you a bigger FoV and it can give the viewer of the panorama the feeling that he is a tiny person in a weird big world.
Software
I use Adobe Photoshop for this tutorial. Basically any version of Adobe Photoshop will work, as long as it supports the Panorama Tools Plugins. You can perhaps do it just as well with other software than Photoshop. If you do not have it, follow closely what I do and find a way to do it alternatively. Even better, add it your procedure to this tutorial. Of course you need the Panorama tools too. Optionally you can also use the Flexify plugin from Flaming Pear for the conversion.
Photographing the christmas ball
To get the least amount of distortion, be sure to point the hanging mechanism of the ball on the opposite side of the camera. Apart from that, use your imagination. Photograph it and load up the resulting photo in Photoshop. For this tutorial I assumed you photographed the ball from straight above.
Converting the picture to an equirectangular image
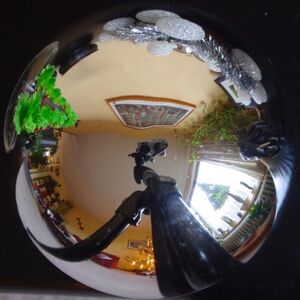
First of all flip the image horizontally, because it is mirrored. Secondly crop it to a square so the edge of the ball touches the edge of of the image on all 4 sides. Finding the edge of the ball is hard, since what you see directly around the ball is per definition exactly the same as what you see in the ball. It is after all a mirror.. Your cropped image should look like this:
While this looks like a Fisheye Projection image, it certainly is not. First of all the FoV is close to 360 degrees, which is very uncommon for a fisheye image. Secondly, with a fisheye the number of degrees covered in the image with each millimeter you move away from the center is the same. That is a difficult sentence, so I'll give an example: Say you draw a circle with a diameter of 1 cm from the center of the image and that cicle covers 10 degrees FoV. Then a circle with a diameter of 2 cm will have a FoV of 2 x 10 = 20 degrees. And so on.
With this reflection, this is not the case. In the center part of the image the rule more or less holds, but as you get nearer to the edge of the ball, more and more degrees are crammed into a mm. Therefore you can not simply defish this image, but you'll have to convert it from "convex mirror" or "mirror ball" to Equirectangular Projection.
To convert it you can use the Panorama Tools Plugins or the flexify plugin from Flaming Pear.
Convert using The Panorama Tools plugins
- From the Photoshop menu, choose Filter - Panorama Tools - Remap.
- Set HFoV and VFoV to 360 degrees. Set Convert From to Convex mirror and set Convert To to PSphere. (A PSphere is the same as equirectangular)
- Click Prefs in the upper right corner, uncheck option a and check options b and c. Make sure the textbox of option c holds the path to the photoshop program itself. The result of the remap will make the image twice as wide as it is high, but photoshop does not allow plugins to alter the image size. Therefore we need to save the image and reopen it.
- Click OK.
Convert using the Flexify plugin from Flaming Pear
- From the photoshop menu, choose Filter - Flaming Pear - Flexify.
- Set input to mirror ball and output to equirectangular. Set Latitude to 0, Longitude and Spin to 90 and Glue to normal.
- Click OK. What you will get is the same output the panorama tools would have given, only the width of the image is condensed by a factor 2. This is because Photoshop does not allow the Flexify filter to change the image dimensions.
- From the photoshop menu, choose Image - Image Size. uncheck constrain proportions and double the image width.
The Result of the conversion
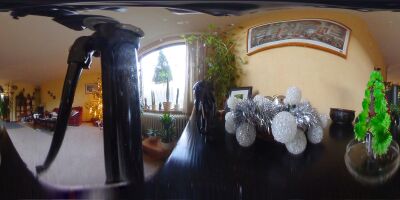
What you should have now is an equirectangular image with the center of the camera exactly in the upper row of pixels, like this:
If you used the Panorama Tools Plugins for the conversion, you may have an image that is one pixel too wide. It's a bug in the Panorama Tools. Use the Image - Image Size dialog to check if the horizontal size is exactly twice the vertical size. If not make it so by altering the horizontal size. Make sure Constrain Proportions is unchecked.
Fixing the Field of View (optional)
You can skip this part if you are not looking for optimal results. I don't, because if you skip it, you might have a sort of barrel distorted panorama.
Unless you shot the ball at at a distance that is infinitely larger than the diameter of the ball, your FoV will not be 360 degrees. It will be less, but usually not much. you can actually calculate the resulting FoV. You do it like this:
FoV = 360 - 2 * arcsin ( d / (2 * s) )
With d being the diameter of the ball and s being the distance of the camera lens to the center of the ball. Make sure that arcsin returns degrees, not radials.
If you don't like to do calculations, just guess. Try 340 degrees.
We are going the use result you got from the calculation to correct the FoV of the image. Let's pretend you got 340 degrees FoV. That means 360-340=20 degrees are missing in the equirectangular image. That 20 degrees is the view right behind the ball. It will be directly opposite to the center of your camera lens. In your equirectangular image, that will be the bottom part of your image. we are going to fill it with black.
In an equirectangular image, The height of the image is directly proportional to the vertical FoV. The horizontal FoV of your image is 360 degrees, but the vertical FoV is not 180 degrees like in a full equirectangular image. Therefore the vertical size of this image should not be half the horizontal size, but a bit less. We are going to scale it by a factor 340/360. So grab your calculator and change the vertical size (Image - Image Size dialog) to 340/360 * old_size. So if your image has a vertical size of 720 pixels, change it to 720 * 340/360 = 680 pixels. Again, make sure Constrain Proportions is unchecked.
Now we have an equirectangular image that is not twice as wide as it is high, but most Panorama Viewers require it to be. To fix that we enlargen the image, filling the extra part with black. From the Photoshop menu, choose Image - Canvas size. Click the middle upper arrow and change the height to half the size of the width. Set canvas extension color to black. Click OK.
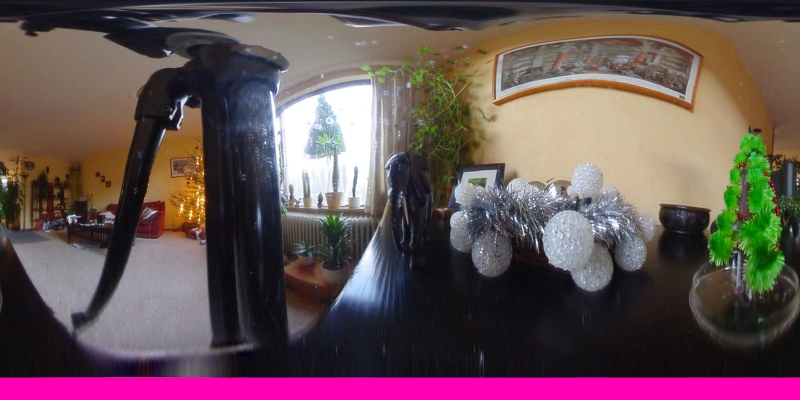
And there you are. Your first christmas ball panorama. It should look something like this:
Note I did not fill it with black, but with purple. Only to show what part was filled up by the canvas size change.
Below this line you can see an interactive example of the image above. Drag the mouse in the image to look around, use ctrl and shift to zoom. My christmas ball was far from round, as you can see :(
<pano file="Christmas_ball_equirectangular_filled.jpg" width="350" height="200" viewer="ptviewer"/>
Saving and viewing the results
Save the image as JPEG and choose a viewer to see your panorama. For a choice of viewers, check the software page. PTViewer would be a good example of a small, easy to use panorama viewer.
Notes
I will make some additions describing how to act if you have not shot the ball from straight above.
--Serge 21:35, 18 Dec 2004 (EST)


