Difference between revisions of "Adding a nadir cap (mirror ball)"
Erik Krause (talk | contribs) m (categorized) |
m (→ImageMagick) |
||
| (16 intermediate revisions by 4 users not shown) | |||
| Line 1: | Line 1: | ||
| − | I wrote a Photoshop action that produces these mirror spheres below out from | + | == Photoshop == |
| − | an equirectangular panorama. As you can see are three sizes available.<br> | + | I wrote a Photoshop action that produces these mirror spheres below out from |
| − | <br> | + | an equirectangular panorama. <br /> |
| − | [[Image:Mirrorball_small.jpg]] [[Image:Mirrorball_big.jpg]] [[Image:Mirrorball_xxl.jpg]] | + | As you can see are three sizes available.<br /> |
| − | <br> | + | <br /> |
| − | <br> | + | [[Image:Mirrorball_small.jpg]] [[Image:Mirrorball_big.jpg]] [[Image:Mirrorball_xxl.jpg]]<br /> |
| − | <br> | + | <br /> |
| − | Small covers 5% ,Big 8% and XXL 12% of panorama height (equirectangular projection)<br> | + | <br /> |
| − | Below you can see the region that will be covered with the mirrorball.<br> | + | Small covers 5% ,Big 8% and XXL 12% of panorama height (equirectangular projection)<br /> |
| − | <br> | + | Below you can see the region that will be covered with the mirrorball.<br /> |
| − | [[Image:Mirrorball_pano.jpg]] | + | <br /> |
| − | <br> | + | [[Image:Mirrorball_pano.jpg]]<br /> |
| − | <br> | + | <br /> |
| − | <br> | + | <br /> |
| − | Here the action set in Photoshop:<br | + | Here the action set in Photoshop:<br /> |
| − | + | [[Image:Mirrorball_action.jpg]]<br /> | |
| − | [[Image:Mirrorball_action.jpg]]<br> | + | <br /> |
| − | <br> | + | <br /> |
| − | <br> | + | Download the Photoshop action here:<br /> |
| − | Download the Photoshop action here: | + | [[Media:cap.atn]] |
| − | [ | + | <br /> |
| − | <br> | + | <br /> |
| − | <br> | + | A similar action with text:<br /> |
| − | Don't know how to install a Photoshop action?<br> | + | [[Media:cap_text.atn]] |
| + | <br /> | ||
| + | <br /> | ||
| + | For a flexible nadir cap which can be streched to your needs:<br /> | ||
| + | [[Media:CapFlex.atn]] | ||
| + | <br /> | ||
| + | <br /> | ||
| + | Don't know how to install a Photoshop action?<br /> | ||
Take a look at [[How to install actions in Photoshop]] | Take a look at [[How to install actions in Photoshop]] | ||
| − | <br> | + | <br /> |
| − | <br> | + | <br /> |
| − | <br> | + | <br /> |
| − | '''Worklflow''' | + | '''Worklflow'''<br /> |
| − | <br> | + | 1.) Open equirectangular / psphere image in Photoshop<br /> |
| − | 1.) Open equirectangular / psphere image in Photoshop<br> | + | 2.) Run desired action (small / big / xxl))<br /> |
| − | 2.) Run desired action (small / big / xxl))<br> | + | 3.) Save as....<br /> |
| − | 3.) Save as....<br> | + | 4.) Finished<br /> |
| − | 4.) Finished<br> | + | <br /> |
| + | <br /> | ||
| + | [[User:Pitdavos|Peter Nyfeler]] (Pitdavos) | ||
| + | <br /> | ||
| + | == ImageMagick == | ||
| + | I wrote an [[ImageMagick]] Windows [http://en.wikipedia.org/wiki/Batch_file batch file] to add a mirror sphere to an equirectangular panorama:<br /> | ||
| + | <pre> | ||
| + | set im_convert="C:\Program Files\ImageMagick-6.5.8-Q16\convert.exe" | ||
| + | set input_image=post_processed.tif | ||
| + | set output_image=nadir_balled.tif | ||
| + | rem Make the mirror ball. | ||
| + | rem -crop takes the part of the image without the nadir | ||
| + | rem -resize resizes the image to height of the nadir | ||
| + | rem -flip flips the image vertically | ||
| + | rem -level darkens the image, because reflection is never 100 percent | ||
| + | %im_convert% %input_image% -crop 12780x6130+0+0 -resize 12780x260! -flip -level 0,130%% temp_nadir_ball.tif | ||
| + | rem Make a gradient image from black to transparent. This is the ambient shadow that is casted by the mirror ball. | ||
| + | %im_convert% -size 12780x130 gradient:none-black temp_gradient.png | ||
| − | + | rem Place the shadow and the mirror ball on the image | |
| + | %im_convert% %input_image% -page +0+6070 temp_gradient.png -flatten -page +0+6130 temp_nadir_ball.tif -flatten %output_image% | ||
| + | |||
| + | del temp_nadir_ball.tif | ||
| + | del temp_gradient.png | ||
| − | [[ | + | pause |
| + | </pre><br /> | ||
| + | Before using it, please adapt the following in the batch file to your situation:<br /> | ||
| + | <ul> | ||
| + | <li>the location of ImageMagick's convert.exe</li> | ||
| + | <li>the input panorama image name</li> | ||
| + | <li>the output panorama image name</li> | ||
| + | <li>the size of the panorama without the nadir cap (12780x6130)</li> | ||
| + | <li>the size of the nadir cap (12780x260)</li> | ||
| + | <li>the size of the ambient shadow (12780x130)</li> | ||
| + | <li>the position of the ambient shadow on the output panorama image (+0+6070)</li> | ||
| + | <li>the position of the nadir cap on the output panorama image (+0+6130)</li> | ||
| + | </ul> | ||
| + | <br /> | ||
| + | Here's an example of a mirror ball created in this way:<br /><br /> | ||
| + | [[File:MirrorBal_ImageMagick.jpg]]<br /><br /> | ||
| + | [[User:Bknops|Bert Knops]] | ||
| + | [[Category:Tutorial:Nice to know]] | ||
Latest revision as of 14:57, 5 June 2010
Photoshop
I wrote a Photoshop action that produces these mirror spheres below out from
an equirectangular panorama.
As you can see are three sizes available.
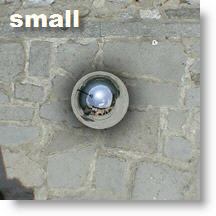
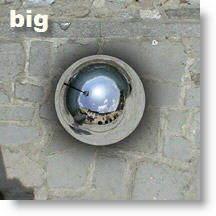
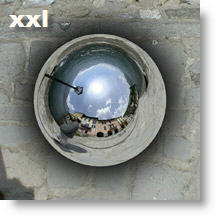
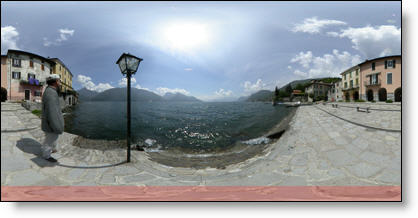
Small covers 5% ,Big 8% and XXL 12% of panorama height (equirectangular projection)
Below you can see the region that will be covered with the mirrorball.
Here the action set in Photoshop:
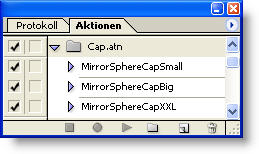
Download the Photoshop action here:
Media:cap.atn
A similar action with text:
Media:cap_text.atn
For a flexible nadir cap which can be streched to your needs:
Media:CapFlex.atn
Don't know how to install a Photoshop action?
Take a look at How to install actions in Photoshop
Worklflow
1.) Open equirectangular / psphere image in Photoshop
2.) Run desired action (small / big / xxl))
3.) Save as....
4.) Finished
Peter Nyfeler (Pitdavos)
ImageMagick
I wrote an ImageMagick Windows batch file to add a mirror sphere to an equirectangular panorama:
set im_convert="C:\Program Files\ImageMagick-6.5.8-Q16\convert.exe"
set input_image=post_processed.tif
set output_image=nadir_balled.tif

rem Make the mirror ball.
rem	-crop		takes the part of the image without the nadir
rem	-resize		resizes the image to height of the nadir
rem	-flip		flips the image vertically
rem	-level		darkens the image, because reflection is never 100 percent
%im_convert% %input_image% -crop 12780x6130+0+0 -resize 12780x260! -flip -level 0,130%% temp_nadir_ball.tif

rem Make a gradient image from black to transparent. This is the ambient shadow that is casted by the mirror ball.
%im_convert% -size 12780x130 gradient:none-black temp_gradient.png

rem Place the shadow and the mirror ball on the image
%im_convert% %input_image% -page +0+6070 temp_gradient.png -flatten -page +0+6130 temp_nadir_ball.tif -flatten %output_image%

del temp_nadir_ball.tif
del temp_gradient.png

pause
Before using it, please adapt the following in the batch file to your situation:
- the location of ImageMagick's convert.exe
- the input panorama image name
- the output panorama image name
- the size of the panorama without the nadir cap (12780x6130)
- the size of the nadir cap (12780x260)
- the size of the ambient shadow (12780x130)
- the position of the ambient shadow on the output panorama image (+0+6070)
- the position of the nadir cap on the output panorama image (+0+6130)
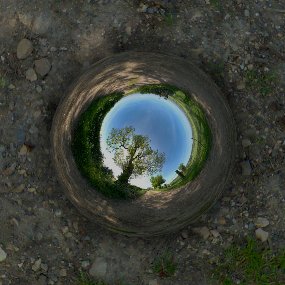
Here's an example of a mirror ball created in this way:
Bert Knops